This is an old revision of the document!
Table of Contents
Events
About events
With events you can save some set of process related data in a separate log, an event log and then analize these sets or data. For events you define trigger conditions and actions, i.e. what data to save. Then you get records which can be used further in many ways:
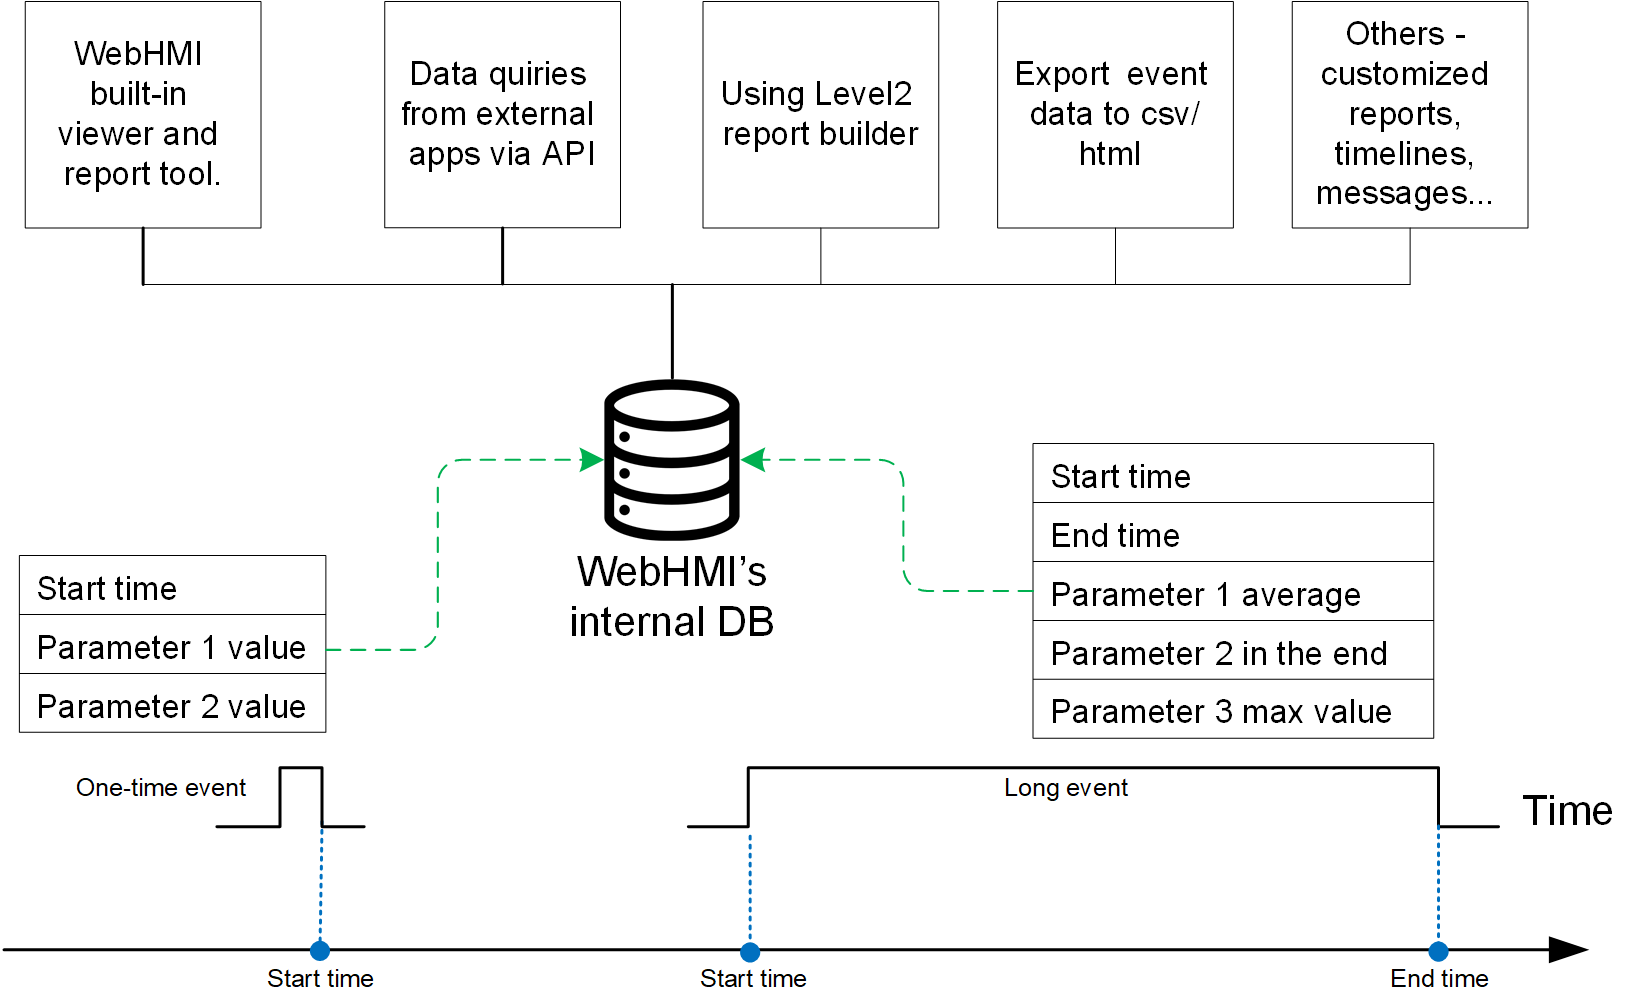
Unlike building the necessary protocols by 'mining' information in the database (logs), event reports are generated 'on the fly' ie. at a pace with the monitoring process.
Customizing an event
Creating an Event
Setup / Events menu is for adding events into a project.

'Add event' button is located in the top-right page corner:

Event Basic settings
In the Basic tab, there are 3 items:
- Title This title is for the list in the Setup menu
- Description To give any comments for the events
- Parent event This event recorded only if a high-level, or parent event is running now. I.e. this event nests in a parent event with all its data.

About parent and child events
If there is some process that could happen “inside” a parent event and is a part of the whole event you can declare it as “child” event. Child events have some features:
- They are recorded only when the parent event is being recorded, i.e. parent's enable condition acts like a “AND” condition for the child
- Parent event's report builder can access child's data for report data
- Child event table are referenced as a links inside the parent event view table. You can disable child event link visibility for the parant event view - see more on this in Viewing events
- Child event run/stop states can be used as timeline source data or Gant diagram inside the parent event report page
- For child events no report entry will be created in the side menu.

Event Condition
After a 3.3 version, WebHMI has simpler condition setting - if some register's value equal or not equal to another value. There could be several conditions acting by logical 'AND' operation.

Of course, the event conditions sometimes may be very complex, but with Lua scripts you can describe any imaginable condition:
-- complex event start condition
local tmr_state, count_down = Timer(var1 > 60, ON_DELAY, OFF_DELAY, "myTimer_1")
local eventEnableCondition = var2 and var3 or (var4 and count_down >= 30)
Lasting vs. one - shot events
The events may have or do not have duration in time. For lasting events (that is more common application) you set special checkbox Has some duration in time. Lasting events are good solution when you have some regular batching process lasting several minutes. For long lasting processes (with durations of days, weeks or more) they not always can be appropriate (see note on events below).
For day, week etc. totals you can latch neccessary data in an one-shot event. For such an event condition must be true for ONLY one scan. Otherwise the records will be added in every scan while event condtion is true. See the note below.
Event Actions
The 'Action' tab of the event settings determines what, how, and when have to be recorded in the event report data structure.

- Save to report checkbox - If selected, it will be possible to set the E-registers in the form of Ey.x.
- Title - The title field for the Setup menu. Possible to re-type here
- See explanation below
- Report title - It is the Report title when it's viewed or accessed from API, etc.
- Menu item name It is how the 'Report' menu entry will look in the side bar menu
- Save data The registers values (except for Event Start/End/Last update time selection) can be written Once per Event or Every X seconds . If you don't want to log some register's value for graphs all the time, but only inside a specific event, you may choose option of 'Every X seconds' and then a series of values will be recorded just in the event log data. Then an external application (or Level2 report builder) can use this data to biuld its own graph.
Selecting data to record in event log
If you press +Add Register to report, the following dialog will appear:

It is possible to pick up 4 options:
- Start time - event start time
- End time - event end time
- Last update time - the time of last record write time in the event ( this is a speical option for testing purposes)
- Any register from Registers list - when you select a register from your project, then you can re-type the parameter title for the event and select which value to take for event log (min / max / first/ last / average):

The rows of selected register have Register E1.0, 1.1, … string left to it. These E-registers are indexed from 0 and further in ascending order (x is an index), y is the event identifier that is assigned to it when it is created and is displayed in the event list. Ey.x - it is address in the WebHMI internal register protocol (see also link), and also it is used to refer to them in Level2 report builder.
Show on timeline - If you select this checkbox, you can see evetn on timeline with set color. See below
Add log message - If you select this checkbox, a message with set priority and content will be generated upon event start.
Viewing events data
The side bar Reports menu is for accessing logged event (it's only available if there are event configured in the project). When viewing the event data you can use calendar, search box, sorting and save selected data to csv, html files:

Since the “Show on timeline” option was set when creating the event, it will also be shown on the timeline. The line with a point on the axis marks the event start time or the one-moment event. You can navigate the timeline holding main mouse button to move horizontaly and zooming with mouse wheel button.

Other event usage options
Besides above application, there are extra options for the recorded event data:
Export event data to csv/html - file

Get event data from external applicaion via API
Send event data to Level2
There is a report builder in the Level2 system as well which uses data taken from WebHMI as a source. More on this here.
Creating a timeline based on time from the event
Customized report view on screens and dashboards
getting historical data from events in WebHMI customized report screen or dashboards (using API and Lua)
Notes on event usage
Editing events in the running project
Due to 'on the fly' method of recordig events, WebHMI project restart will cause an event being recorded to “split”. If you have some important report or critical data in your project and edit or comission the project remotely, apply changes when the event unlikely to happen or won't cause data distortion.
One - time events
With one-time event, i.e. those not having 'event has duration' checkbox set, remember that while the event condition is true WebHMI will generate excess records in the DB on every scan. Use lua script which provides one scan duration of the event enabling condition.
The script which gives a right condtion for an one-shot event (running every hour) could be like this:
function main (userId)
  -- vars
  local prev_cur_hour = R("cur_hour") -- read current stored value
  local cur_hour = os.date("%H", os.time()) -- read RTC
  -- logic
  if (cur_hour ~= prev_cur_hour) then
     W("one_time_event_condition", 1)
     W("cur_hour", cur_hour)
  else
     W("one_time_event_condition", 0) -- prevents further calls
  end
end
Lasting events with different start and end condition
Be carefull with different start and end condition for lasting events. Becuase when they intersect, i.e. end conditino happens while start condition is true, you will get multiple events at once.