Table of Contents
![]()
Events
About events
With events you can save some set of process related data in a separate log, an event log and then analize these sets or data. For events you define trigger conditions and actions, i.e. what data to save. Then you get records which can be used further in many ways:
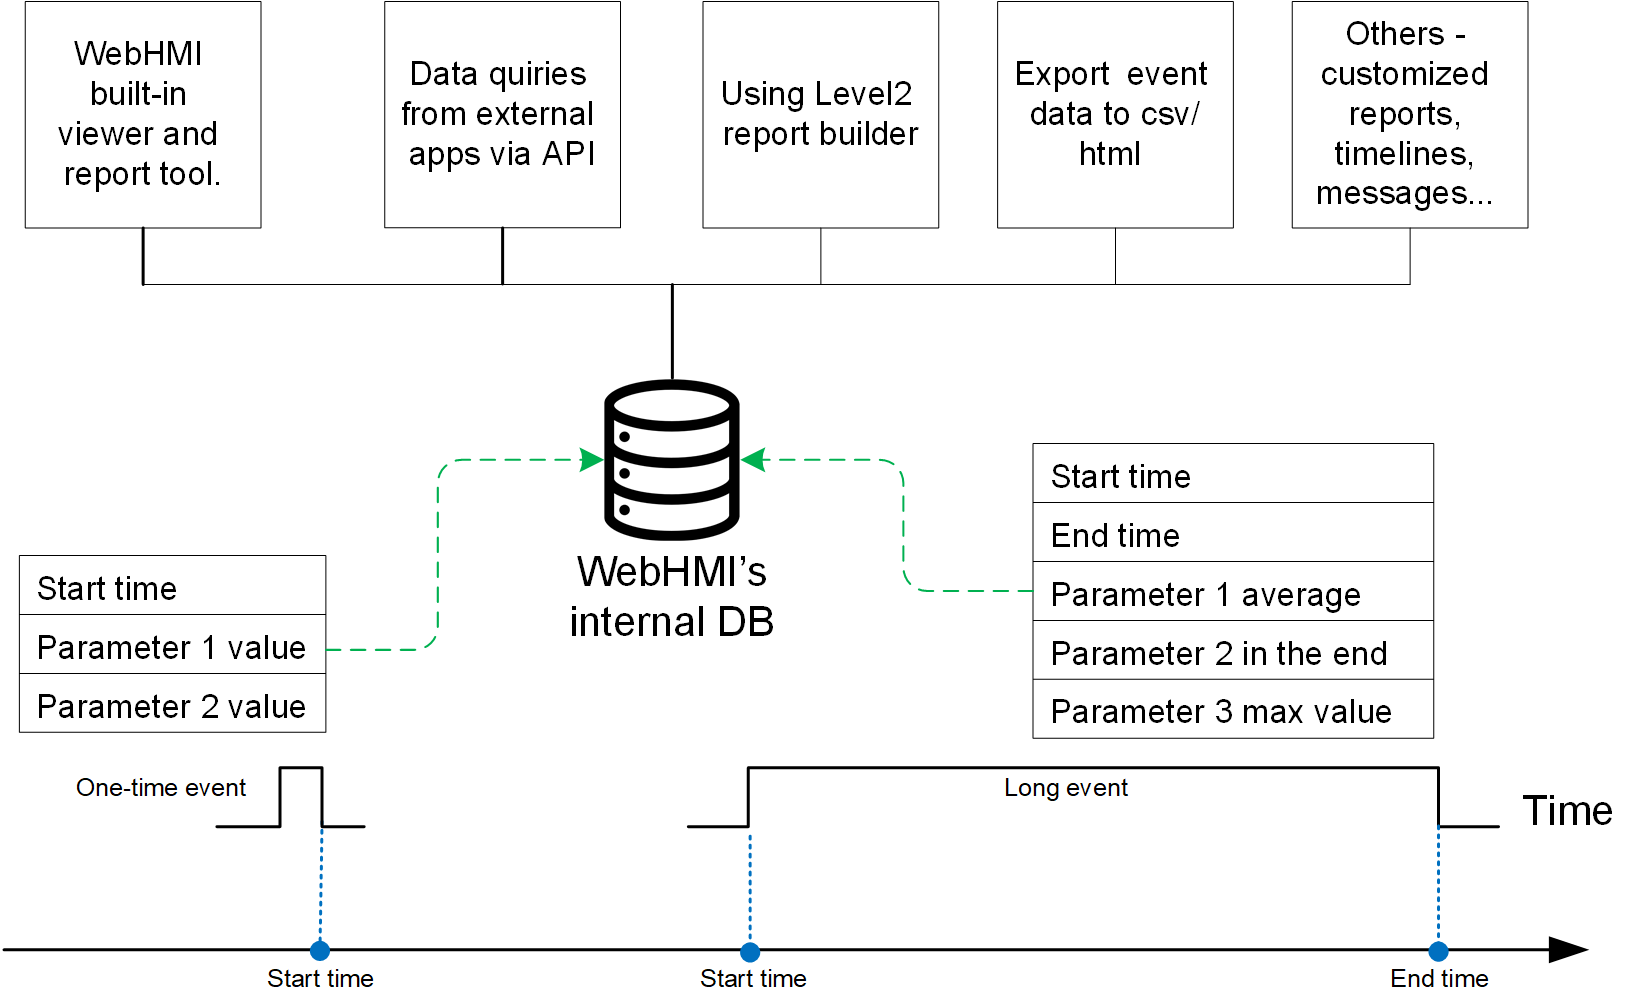
Unlike building the necessary protocols by 'mining' information in the database (logs), event reports are generated 'on the fly' ie. at a pace with the monitoring process.
Customizing an event
Creating an Event
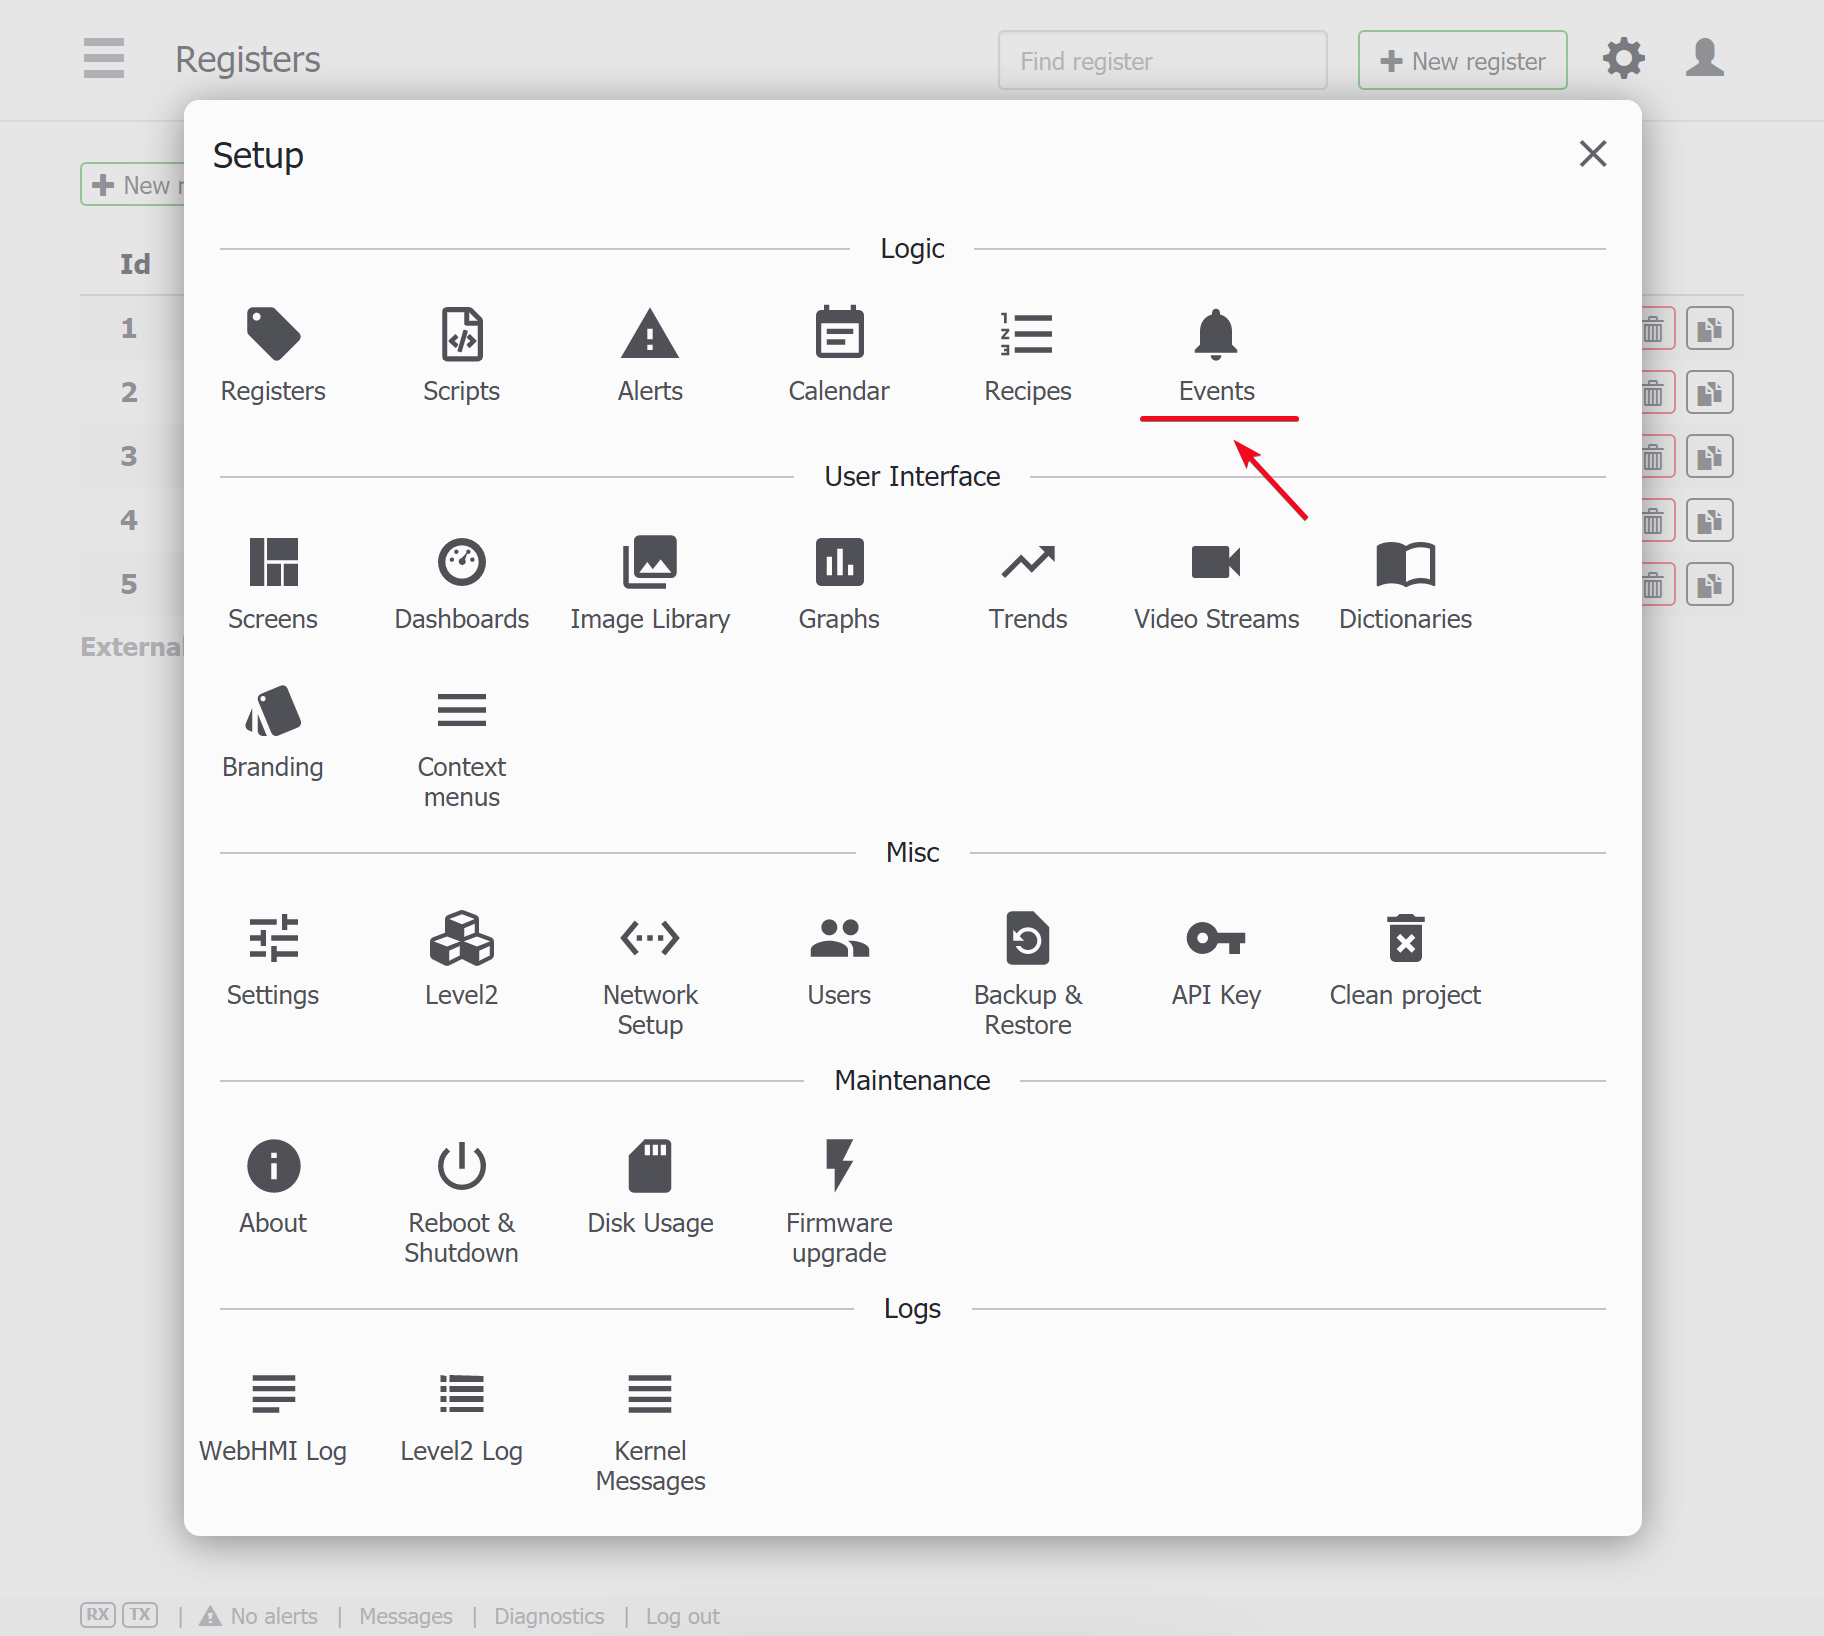
Setup / Events menu is for adding events into a project.
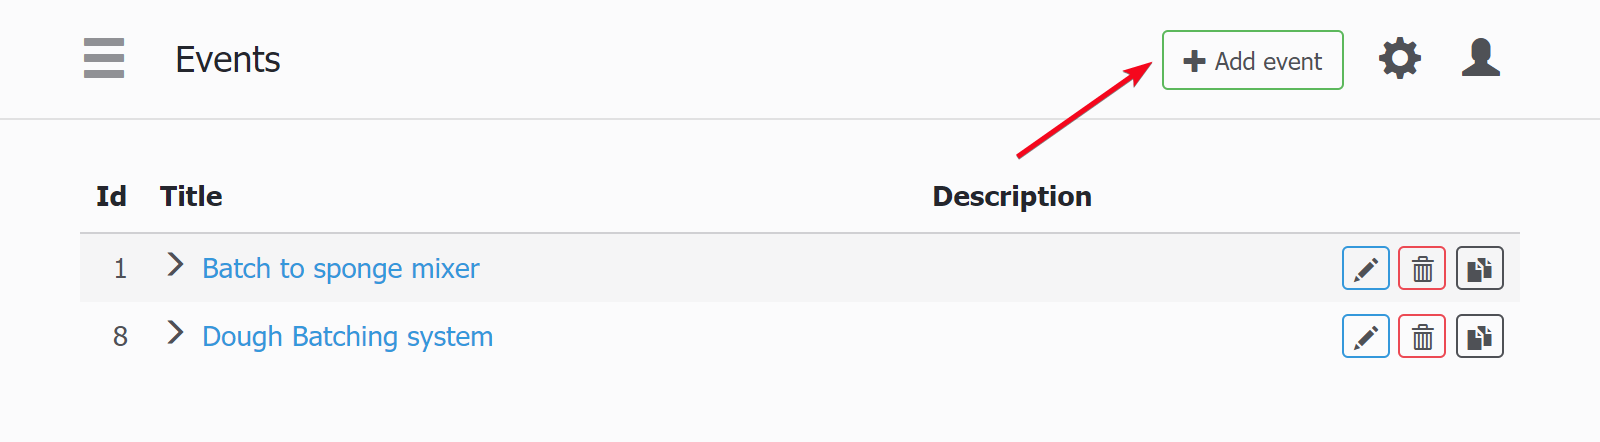
'Add event' button is located in the top-right page corner:
Event Basic settings
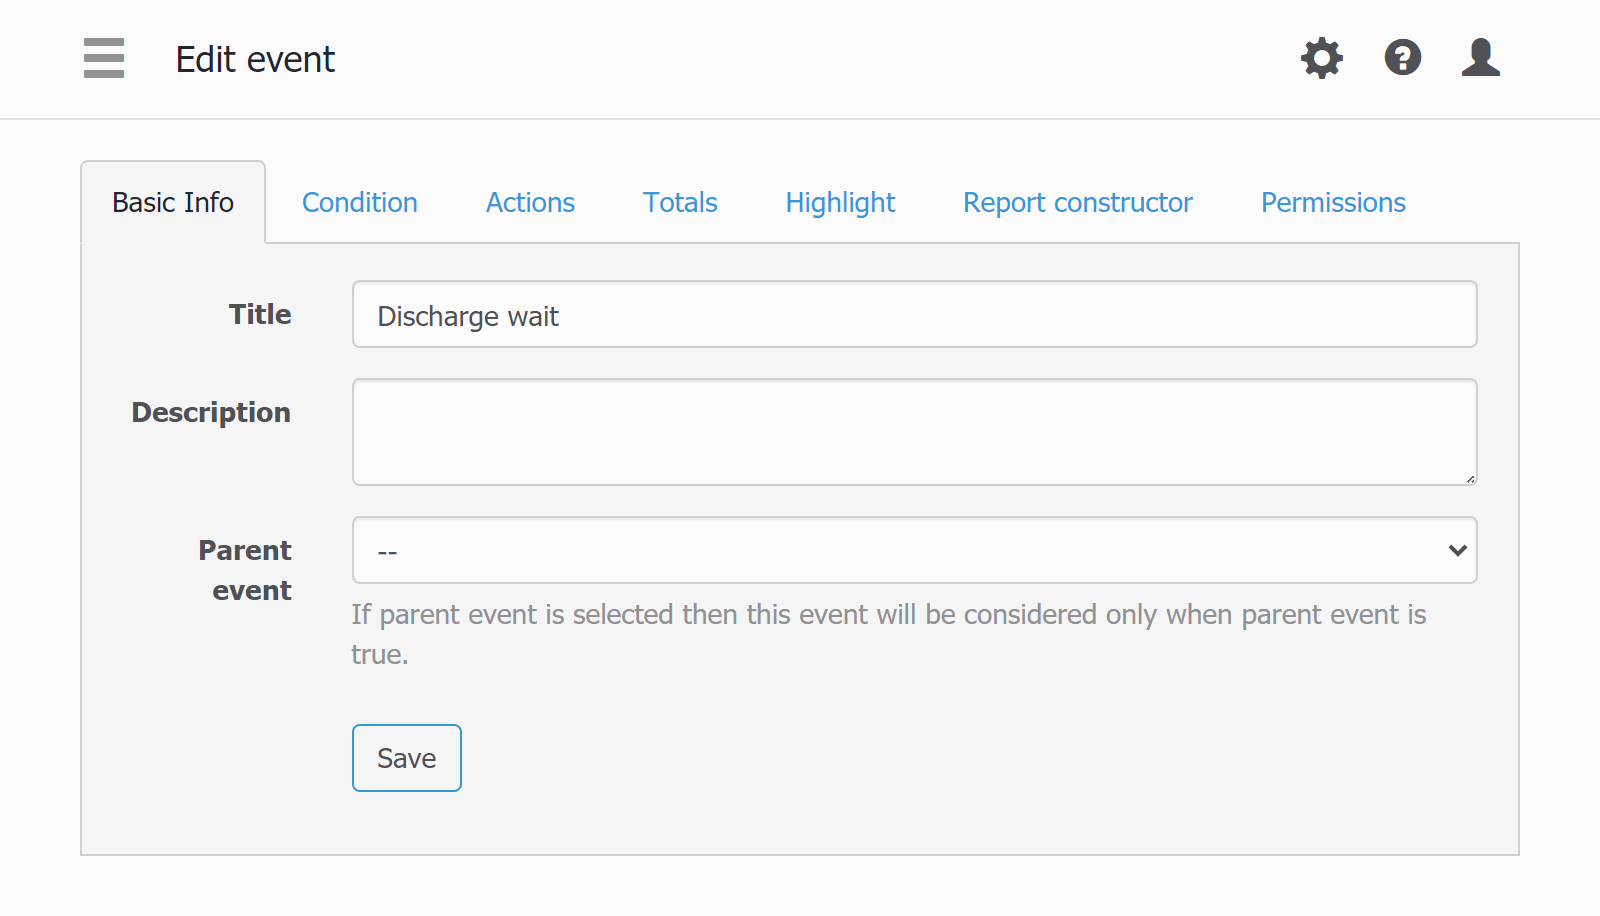
In the Basic tab, there are 3 items:
- Title This title is for the list in the Setup menu
- Description To give any comments for the events
- Parent event This event recorded only if a high-level, or parent event is running now. I.e. this event nests in a parent event with all its data.
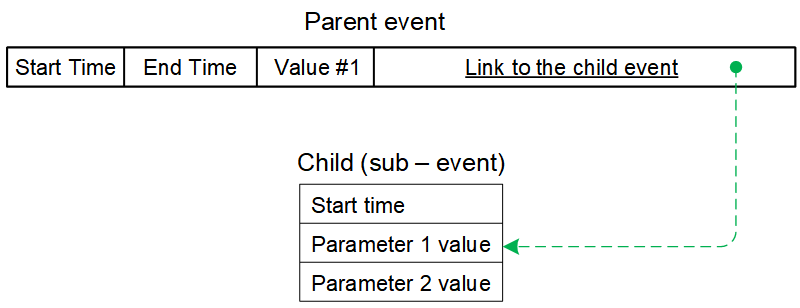
About parent and child events
If there is some process that could happen “inside” a parent event and is a part of the whole event you can declare it as “child” event. Child events have some features:
- They are recorded only when the parent event is being recorded, i.e. parent's enable condition acts like a “AND” condition for the child
- Parent event's report builder can access child's data for report data
- Child event table are referenced as a links inside the parent event view table. You can disable child event link visibility for the parant event view - see more on this in Viewing events
- Child event run/stop states can be used as timeline source data or Gant diagram inside the parent event report page
- For child events no report entry will be created in the side menu.
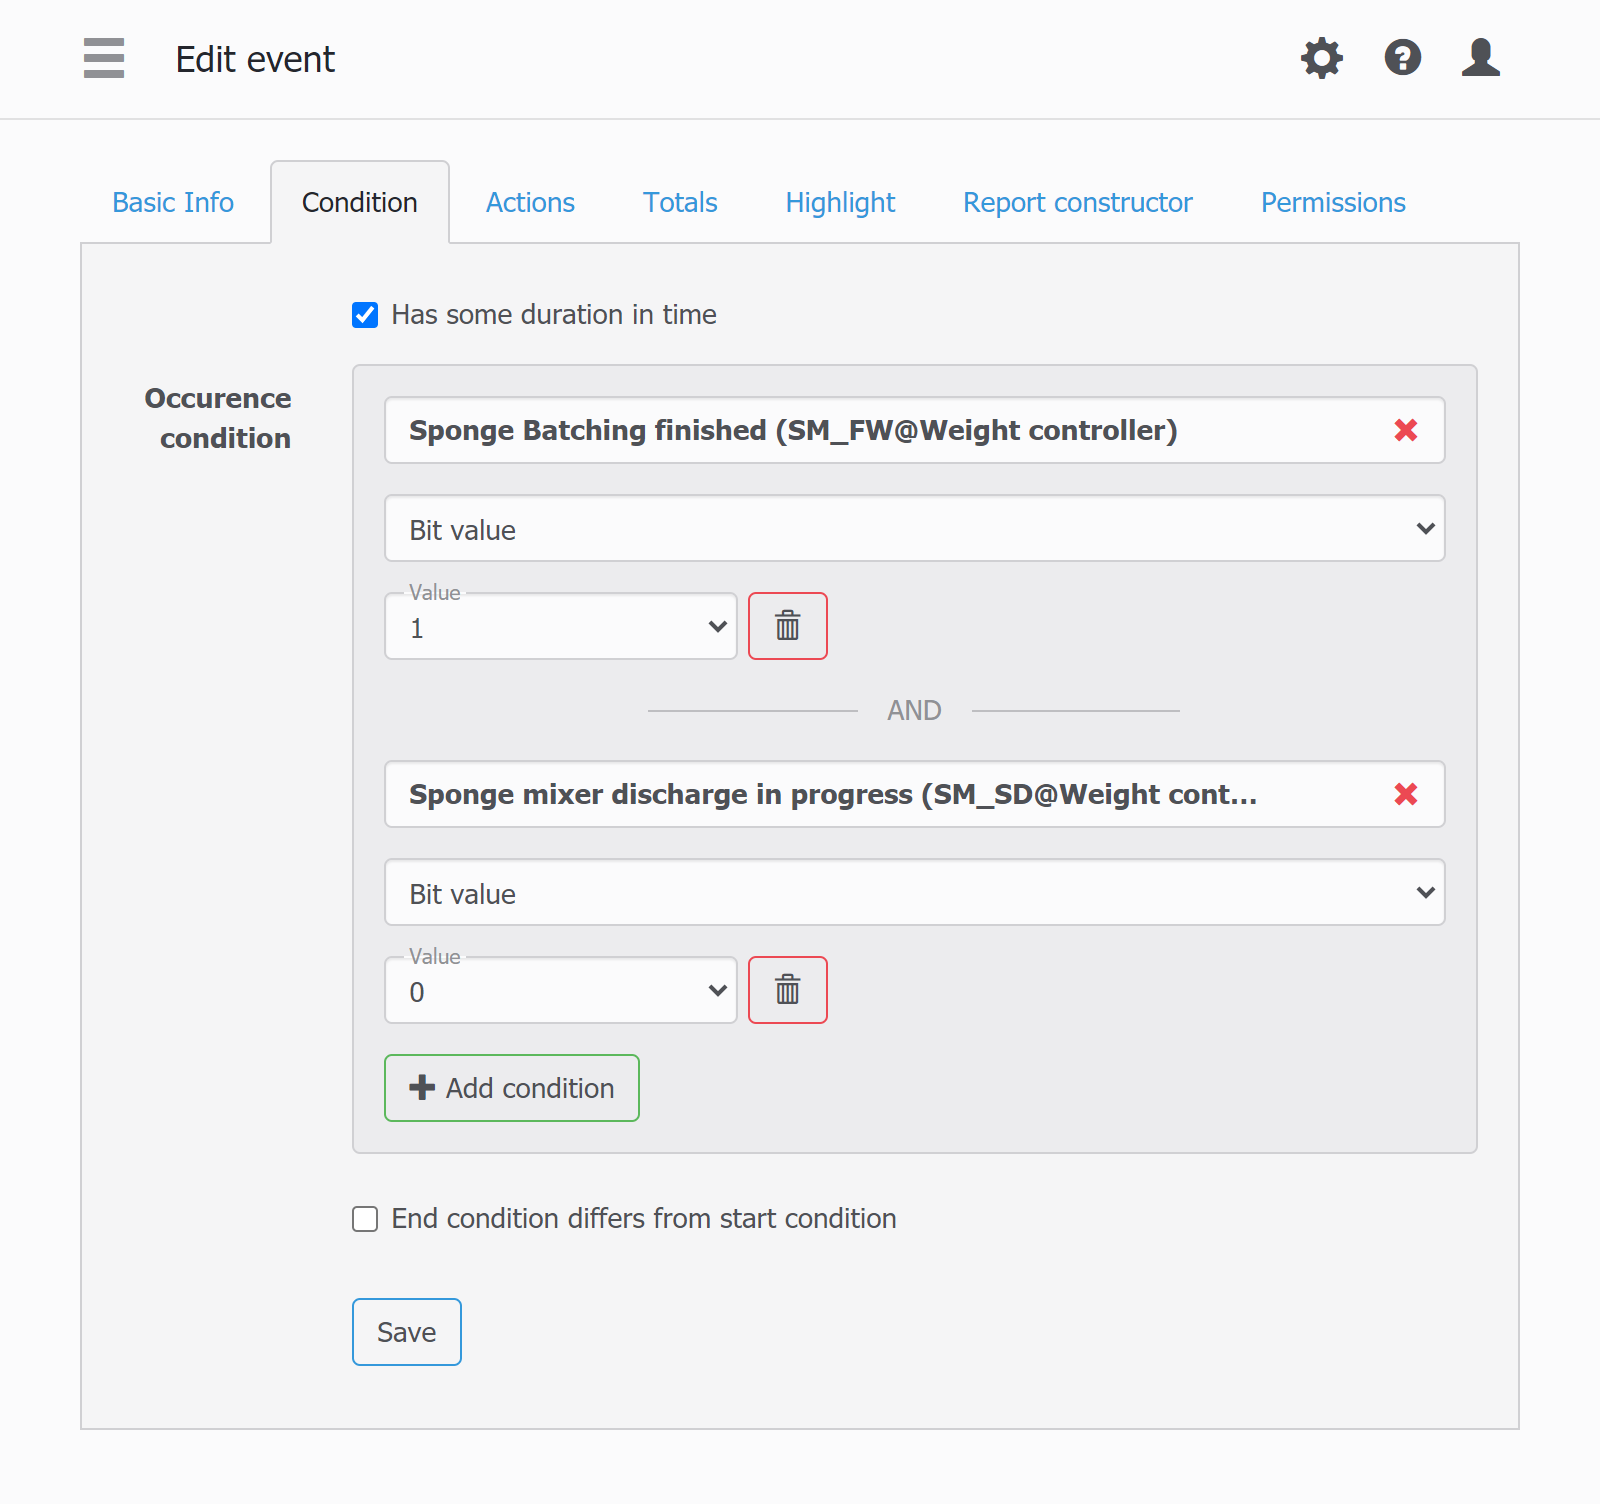
Event Condition
After a 3.3 version, WebHMI has simpler condition setting - if some register's value equal or not equal to another value. There could be several conditions acting by logical 'AND' operation.
Of course, the event conditions sometimes may be very complex, but with Lua scripts you can describe any imaginable condition:
-- complex event start condition
local tmr_state, count_down = Timer(var1 > 60, ON_DELAY, OFF_DELAY, "myTimer_1")
local eventEnableCondition = var2 and var3 or (var4 and count_down >= 30)
Lasting vs. one - shot events
The events may have or do not have duration in time. For lasting events (that is more common application) you set special checkbox Has some duration in time. Lasting events are good solution when you have some regular batching process lasting several minutes. For long lasting processes (with durations of days, weeks or more) they not always can be appropriate (see note on events below).
For day, week etc. totals you can latch neccessary data in an one-shot event. For such an event condition must be true for ONLY one scan. Otherwise the records will be added in every scan while event condtion is true. See the note below.
Event Actions
The 'Action' tab of the event settings determines what, how, and when have to be recorded in the event report data structure.

- Save to report - enables selecting registers and setting up logging action options.
- Report title - It is the Report title when it's viewed or accessed from API, etc.
- Menu item name It is how the 'Report' menu entry will look in the side bar menu
- Save data There are 2 options:
- Once per Event - the registers values are written once
- Every X seconds . All data will be saved at regular interval, i.e. there will be multiple records with their respective timestamps. This option is used when you want to build a graph based on the event data in Level2 report builder or use API to get this data.
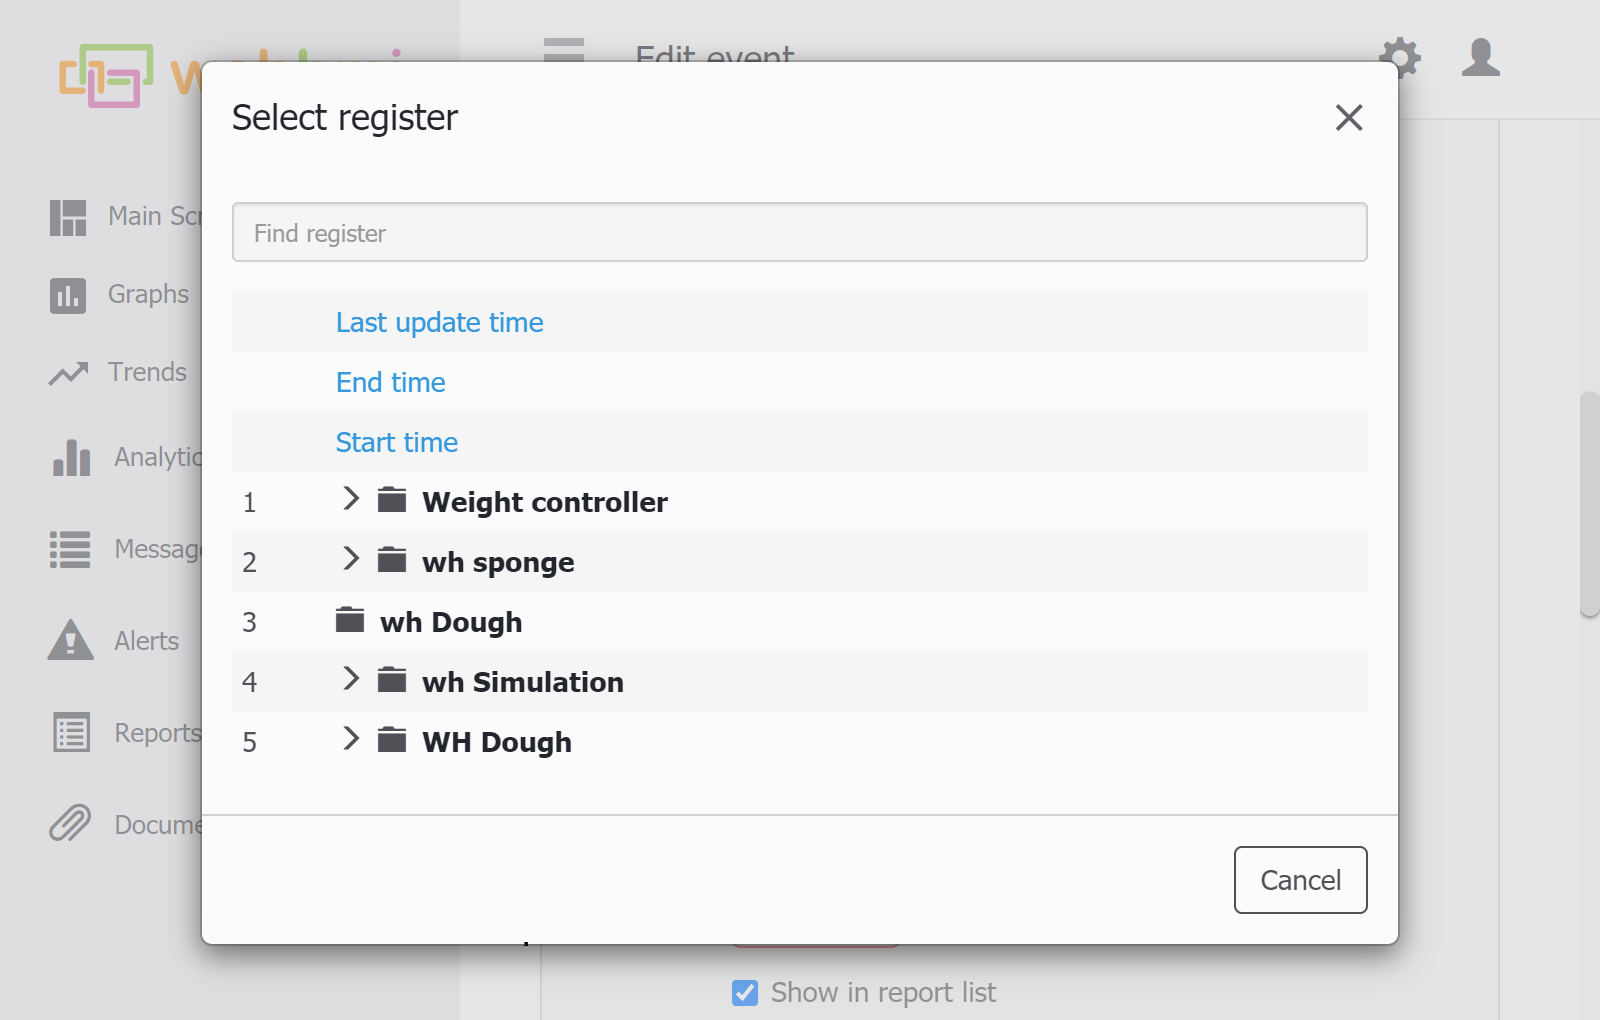
Selecting registers for the event
Besides a common register selection list, there are 3 extra values in the list:
- Start time - event start time
- End time - event end time
- Last update time - the time of last record write time in the event ( this is a speical option for testing purposes)
- Register Ey.x - Thе Ey.x notation can be used to refer this data in the internal register's address, but this registers will be read only while the event is recording. When no recording in progrees, the register will be nil and seen as '-'.'y' - means event id for reference, 'x' - is a order number in the event's actions. You can change registers's title and change recording options:
- you can select first value or last, maximal, minival, average.
- For the reigsters with time or duration format set, the format field will be promtped as time format (H:i etc.)
- Show in report list - this checkbox hides or unhides the value in the report view. E.g. you can show only most important fields in the report list, but show this data later, in the detailed report.
- Show on timeline - the checkbox makes the event to be shown in the timeline viewer.
- Add log message - a record will be added to the messages log upon event trigger.
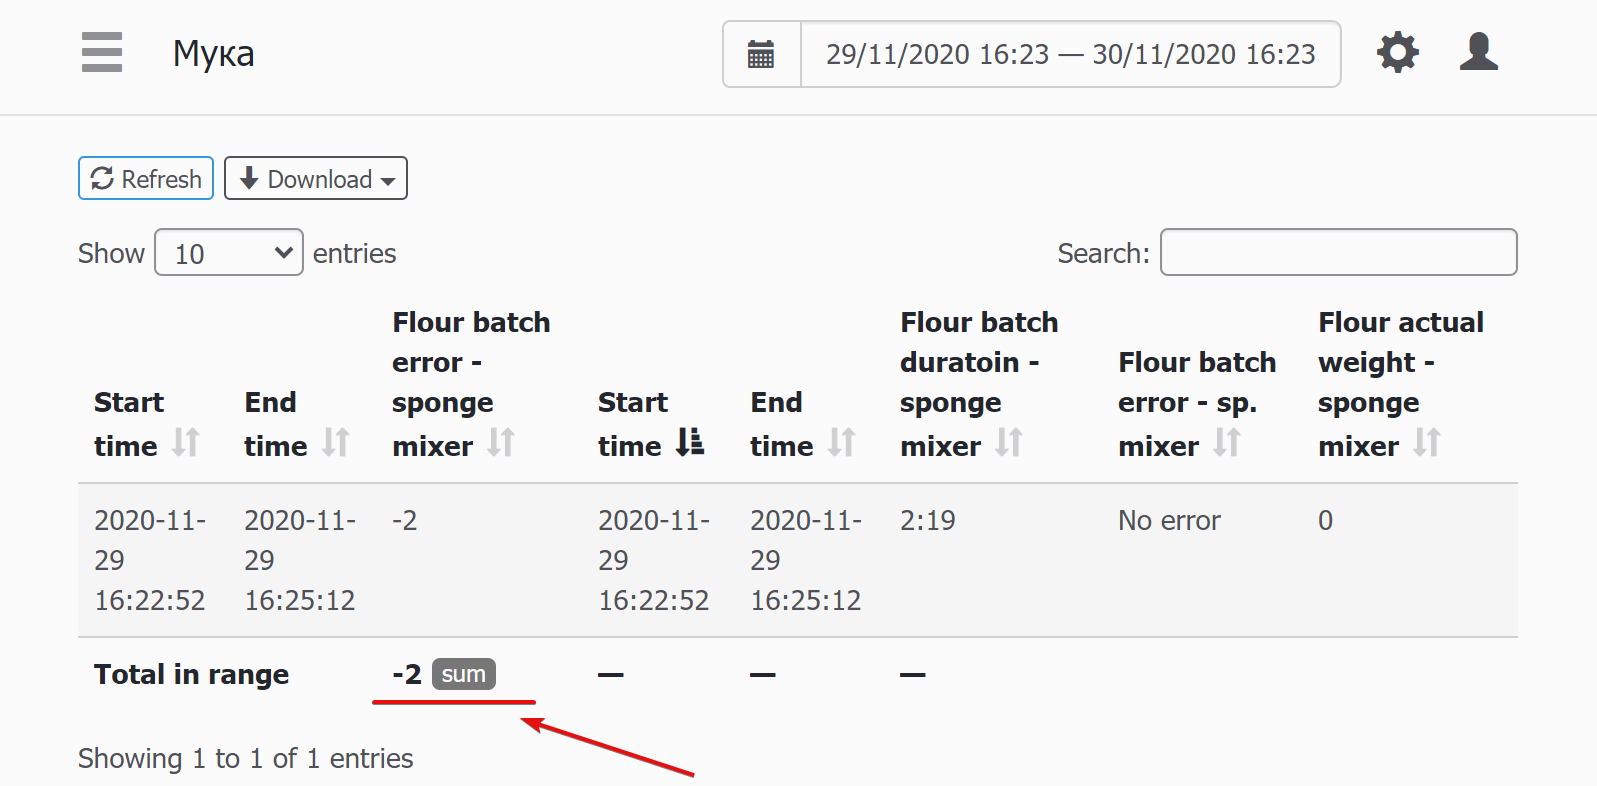
Viewing events data
When there are configured and logged events in a project, an event viewing page became accessible too:
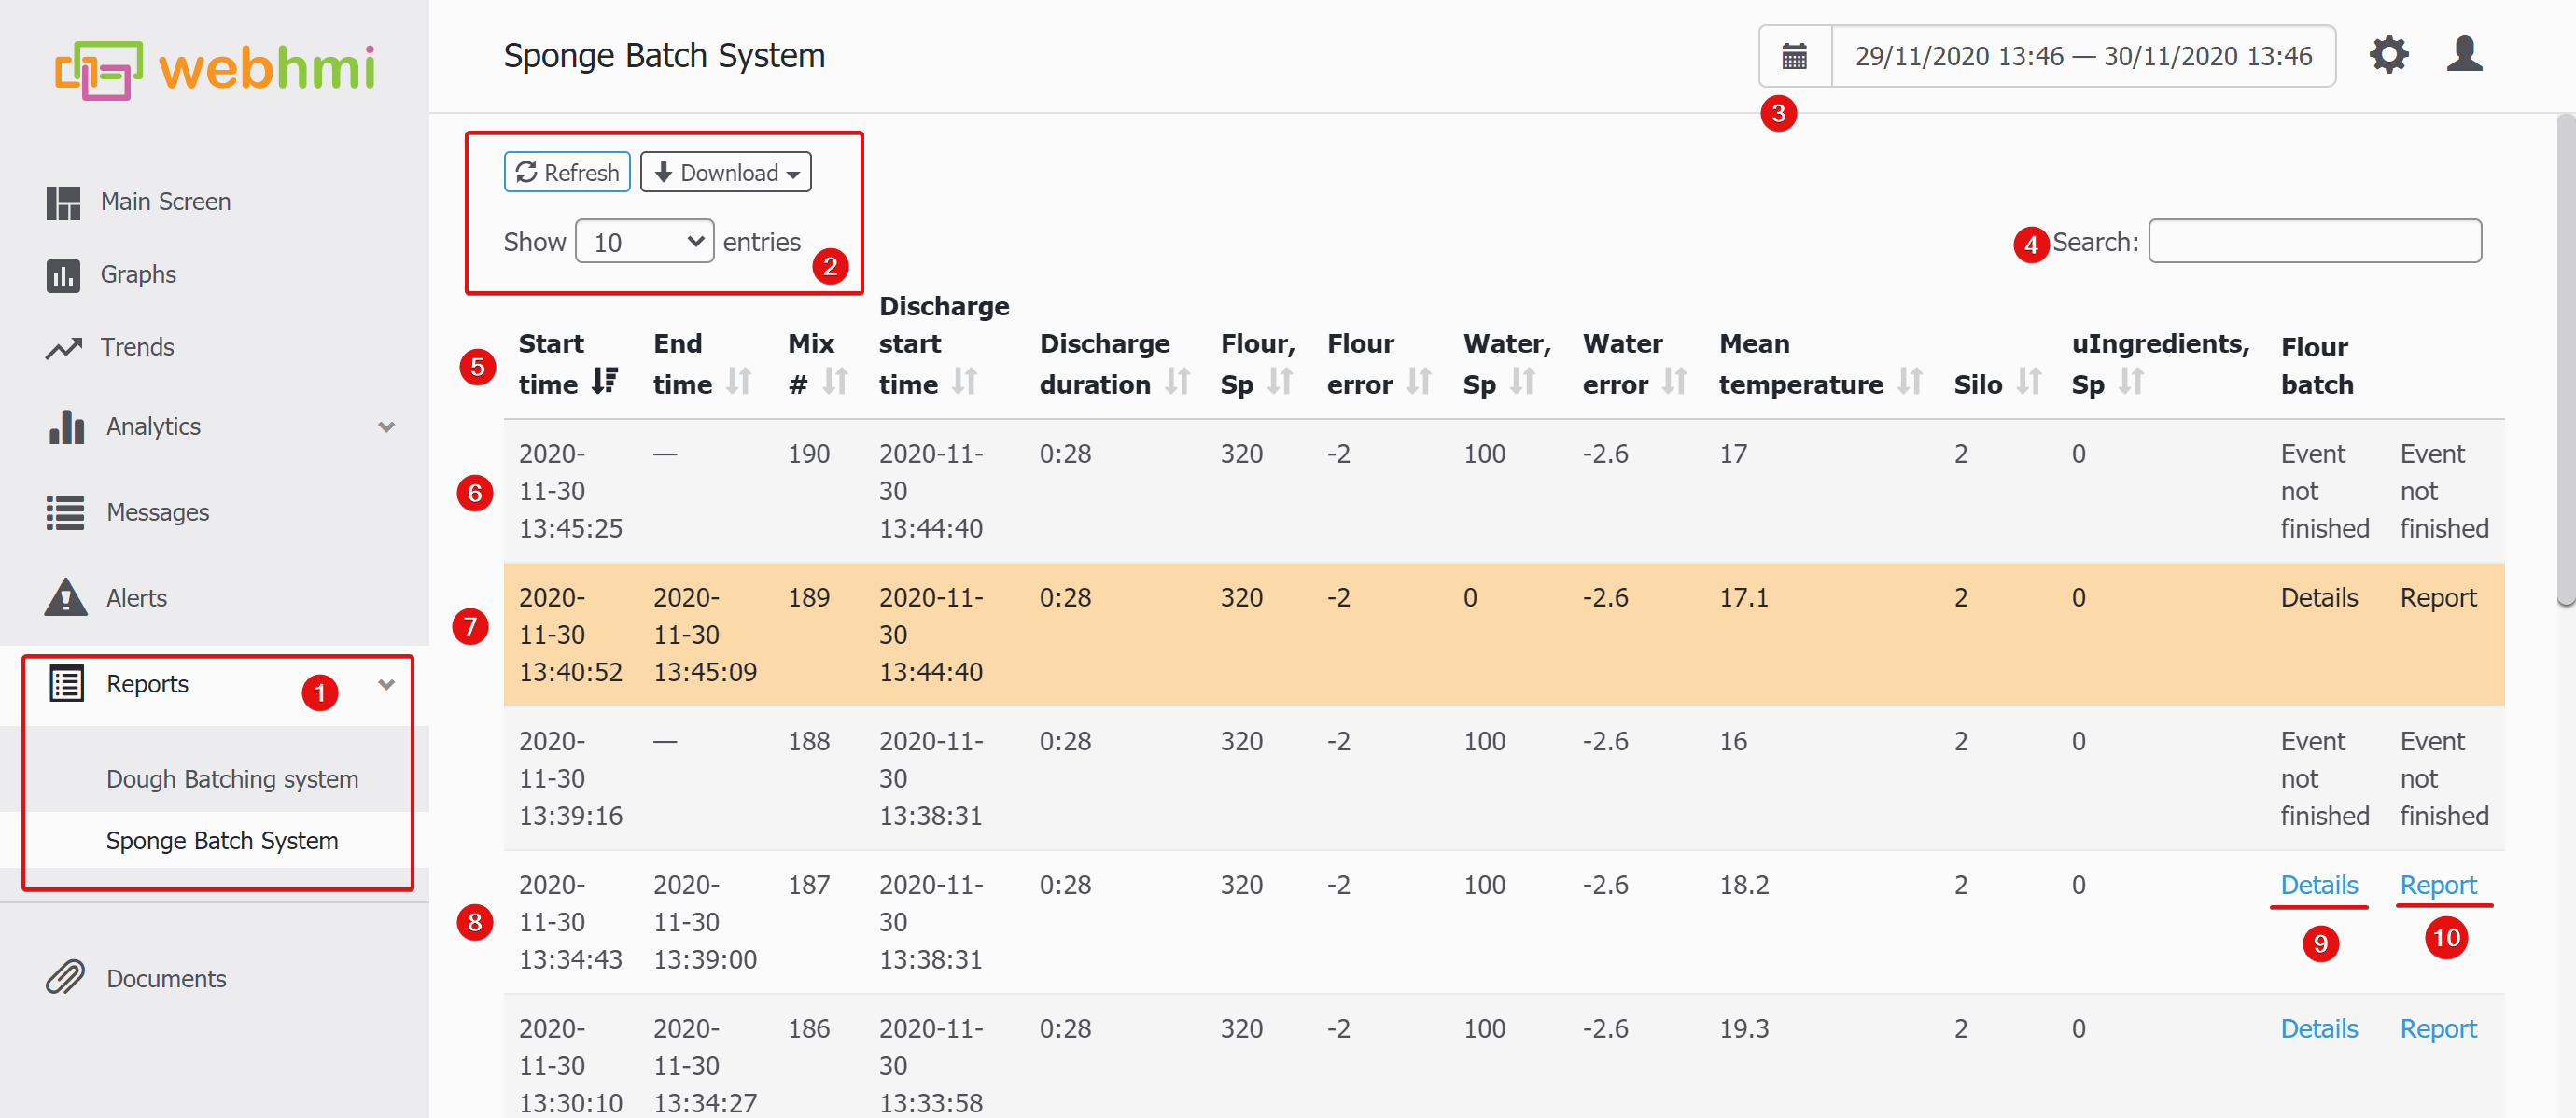
- Report access menu
- Refresh, adjust list length and download buttons. The latter has csv | html options.
- Calendar to pick desired time interval for viewing
- Search omnibox
- Table header. The columns names are action titles set in Actions tab. There are sort arrows as well.
- This is a row with unfinished event i.e. not having end condition fulfilled and interrupted by a new start event condition.
- Highlighted event
- Row with normal data.
- Link to the wrapped (daughter, or nested) event
- Link to the event report, configured in the Report builder.
Highlighting events
You can mark some row in the table (having error, alert etc.). There is a 'Highlight' tab in the event configuration, where you can set the condition:
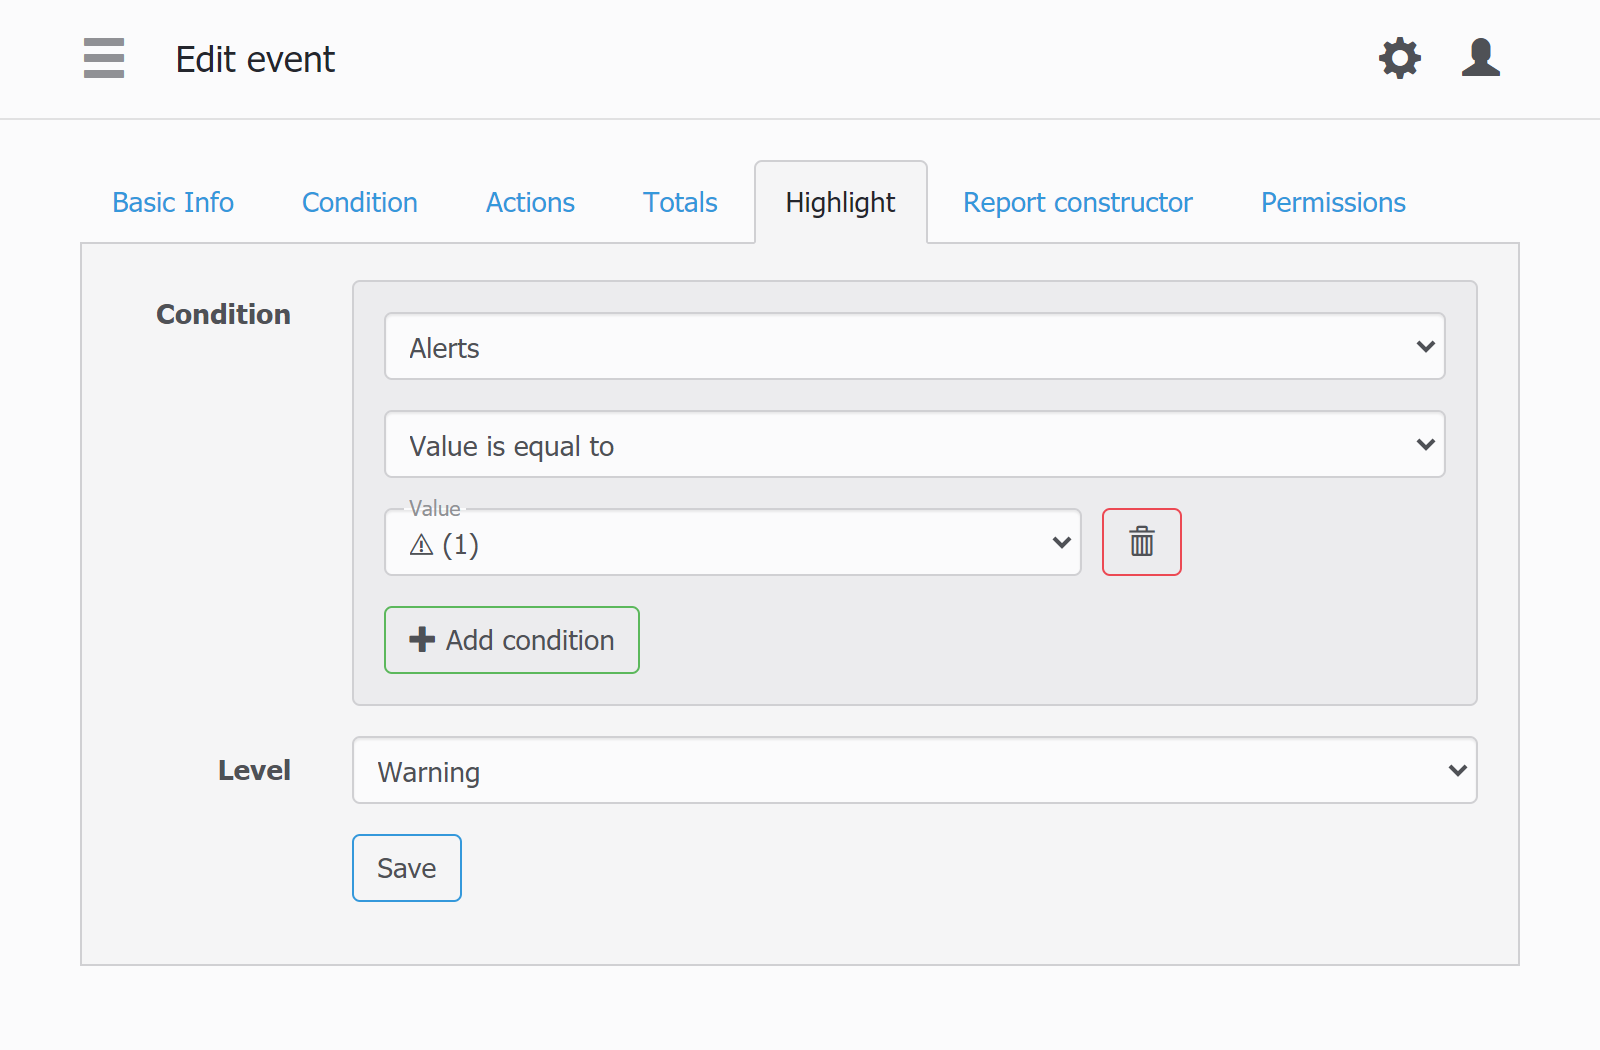 Then the rows will be highlighted like #7 in the list above.
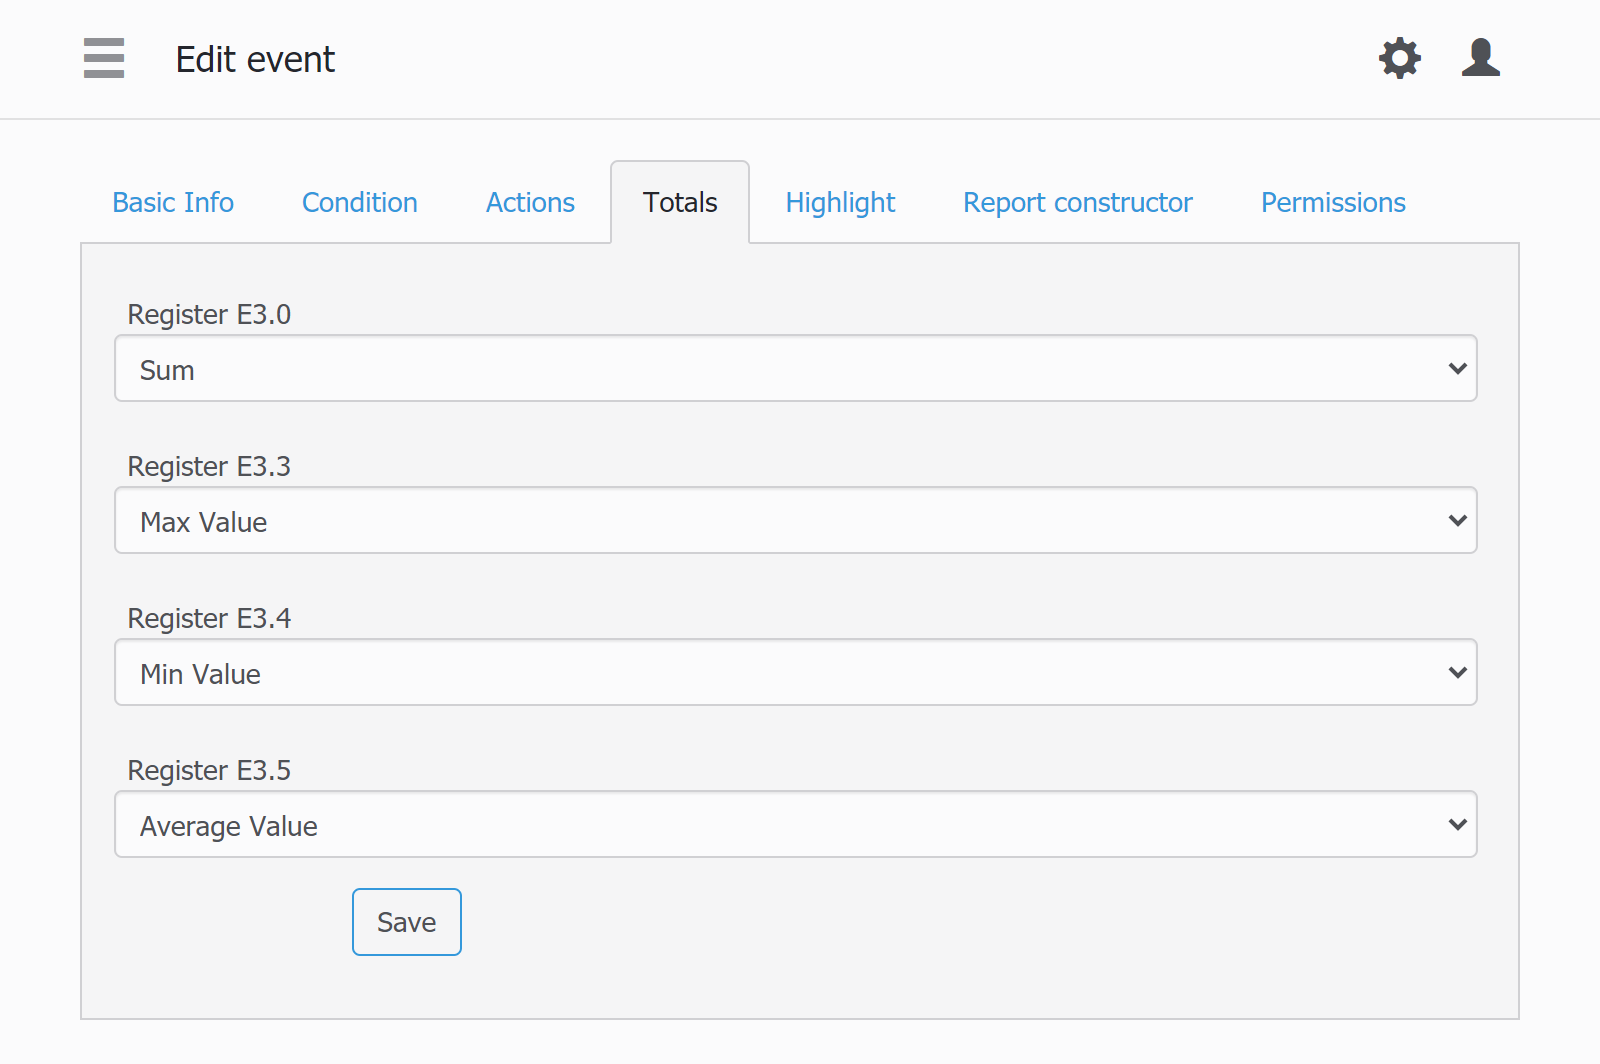
Calculating column totals
For the columns of the event view table, you can add totals in the table's bottom. They are set up in the “Totals” tab:
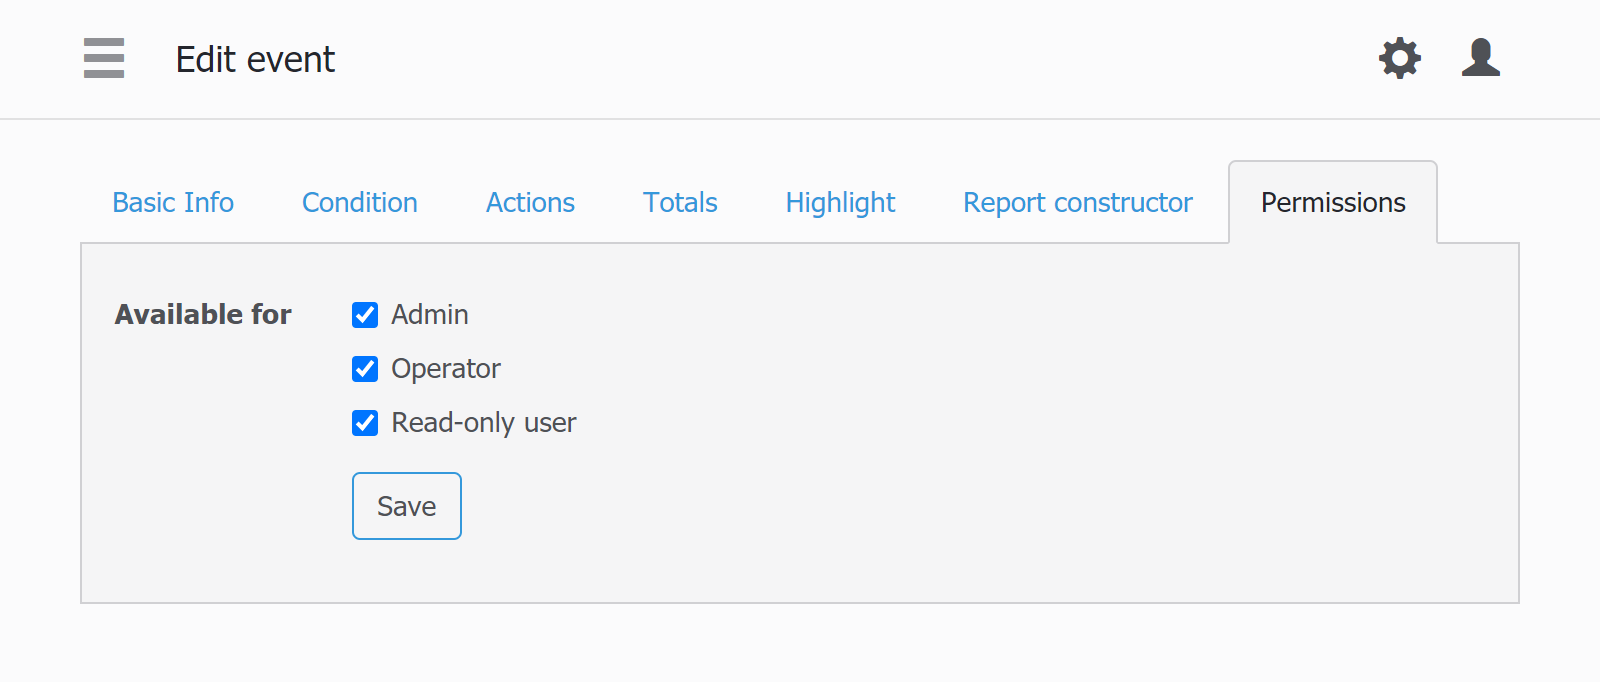
Setting up permissions
You can set permission for the users who may access event view table.
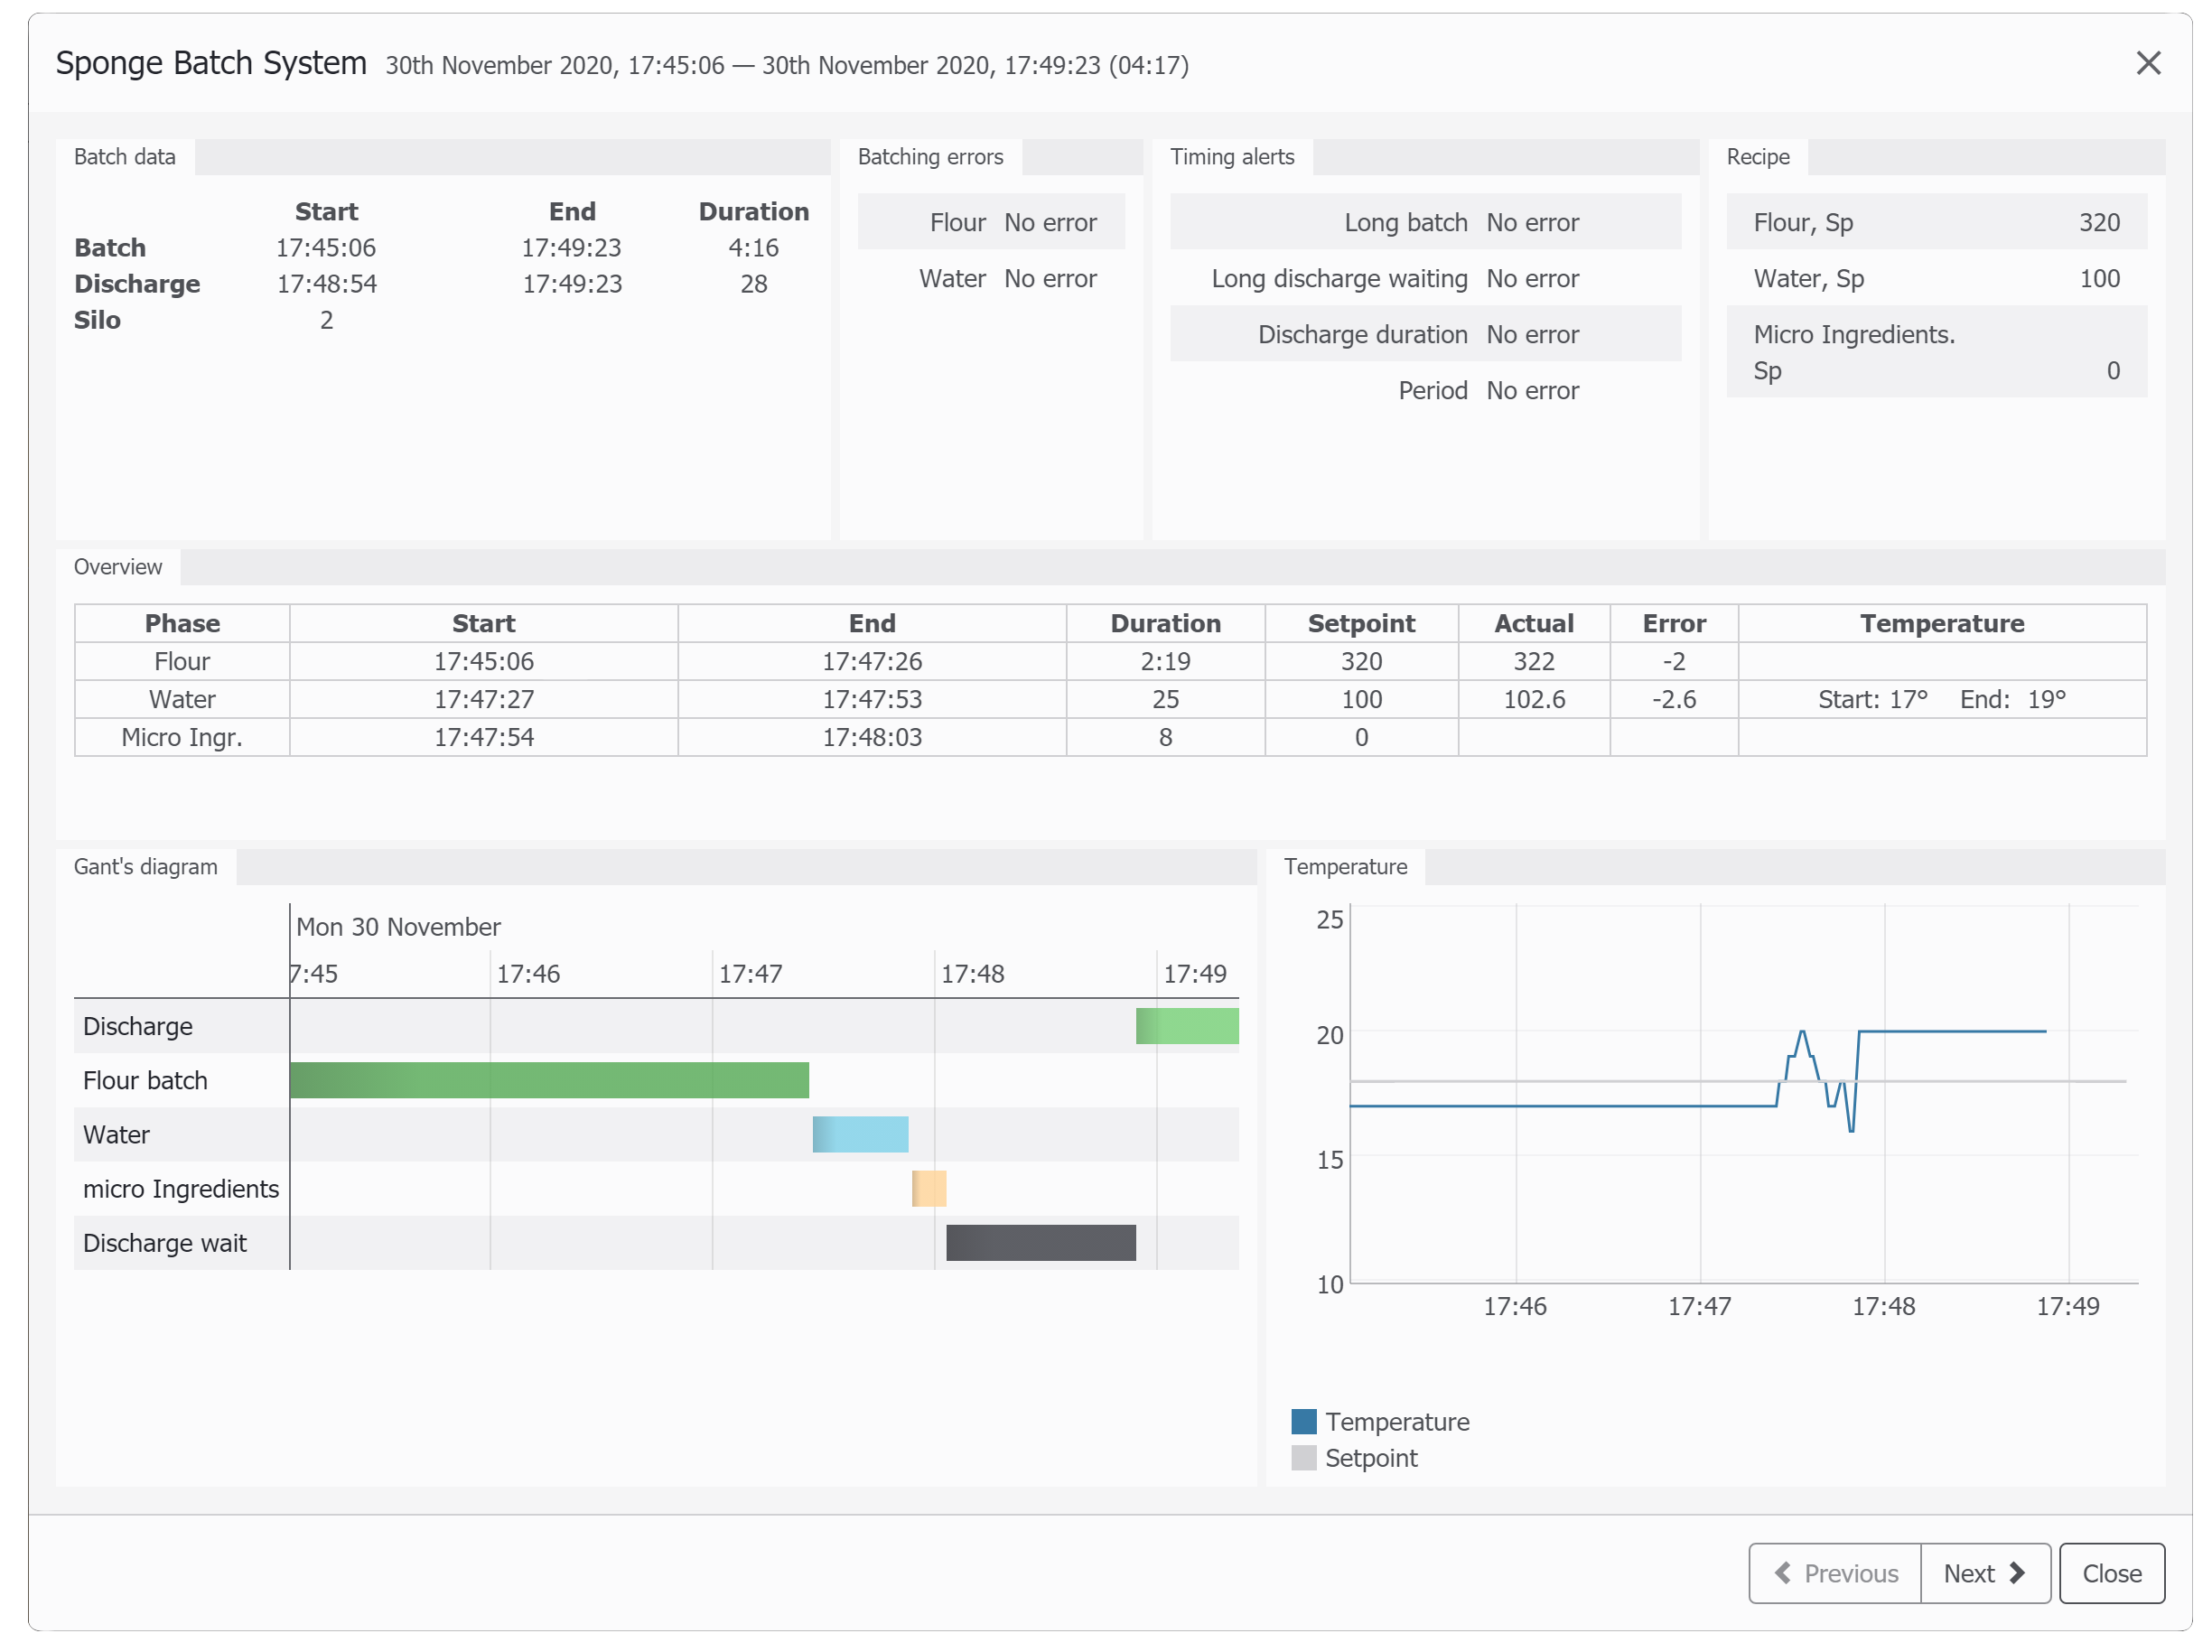
Report constructor
There is a report constructor similar to the screen constructor right in the event configuration. It can show that kind of a report:
 Like in screen editor, you pick widgets and arrange them on the canvas.
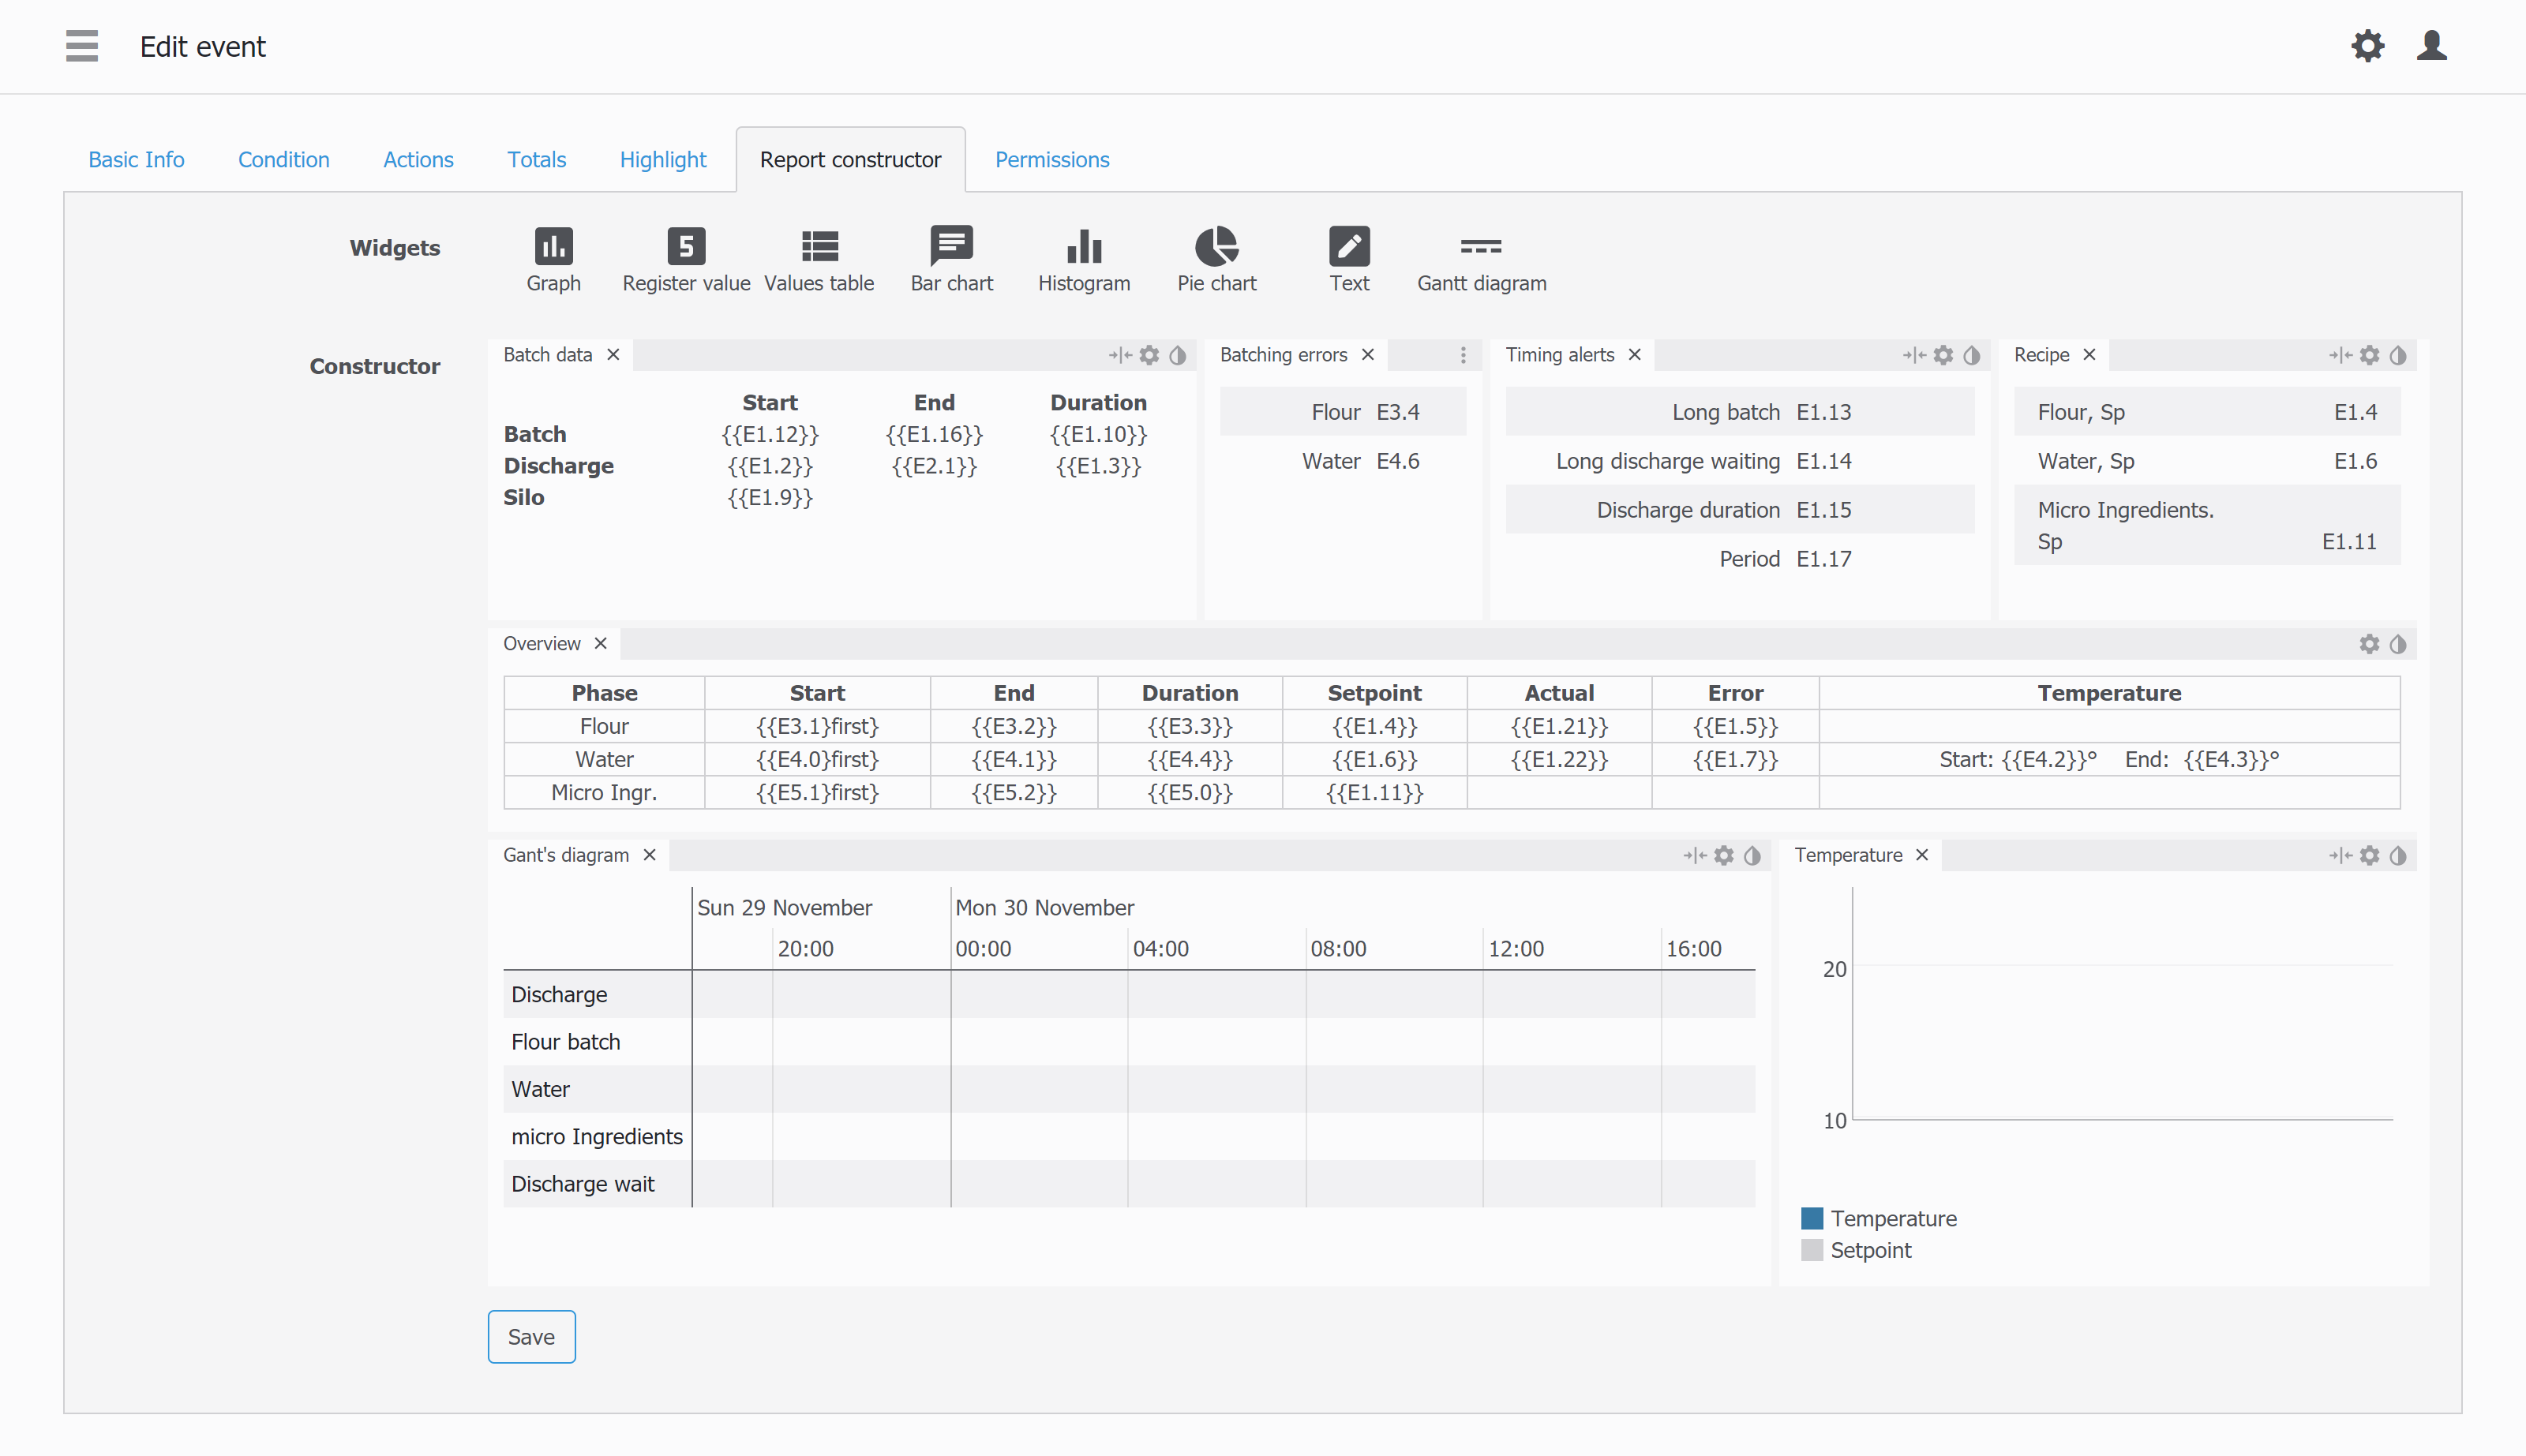
Below notes on the widgets for the report constructor are given:
Graph widget
The graph widget is drawn based on the graph already existing in the project. You just pick one of the graph from a list:
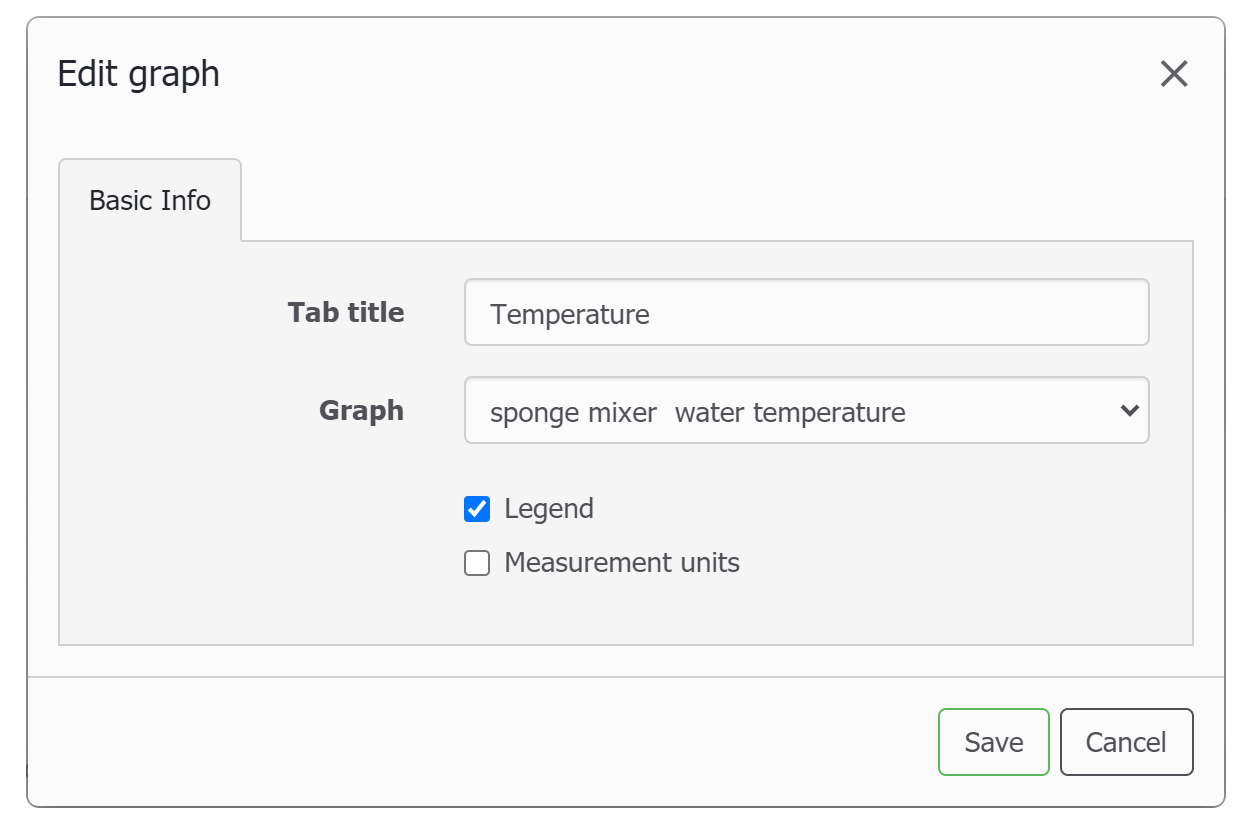 For the time range, event start / end times are used.
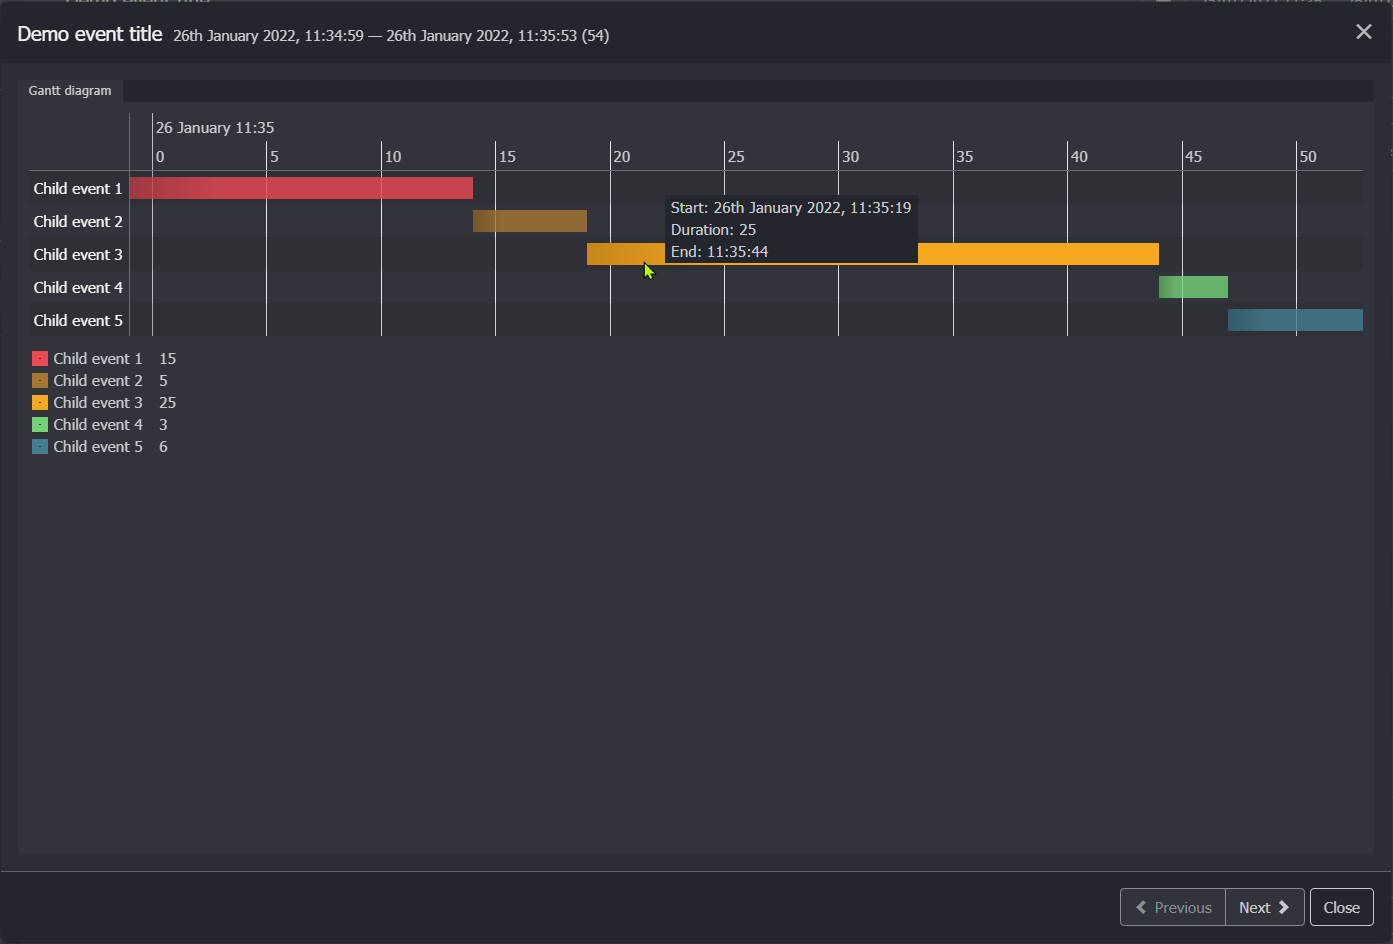
Gannt widget
It's similar to that of the screen widget. You can select only child event as data source for the diagram.

The summary shows duration of all events:
Please refer to the demo project gannt diagram in events example. Rename the file to .bak after download.
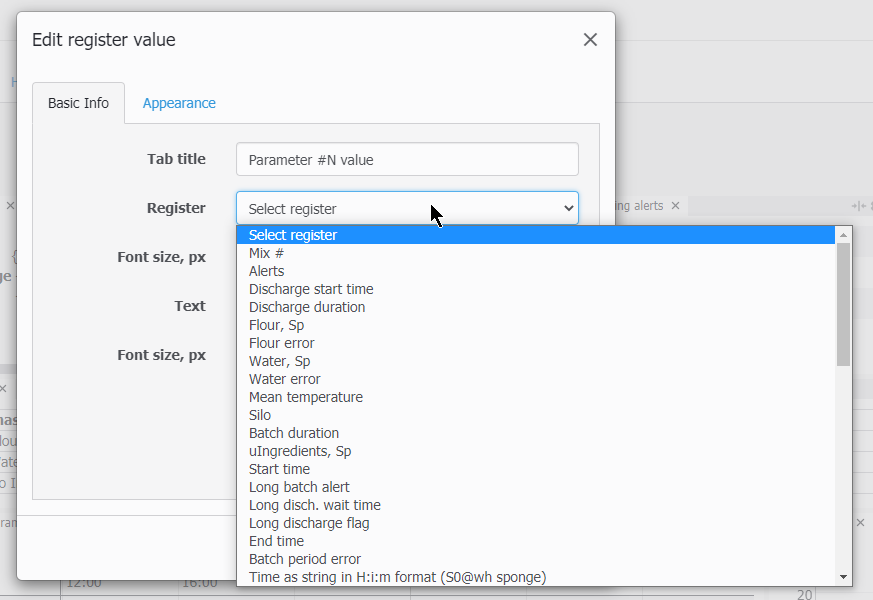
Register value
Register value widget is similar to that in the screen editor, except for register selection: you can only pick up one of the event's (or nested sub-events) actions.
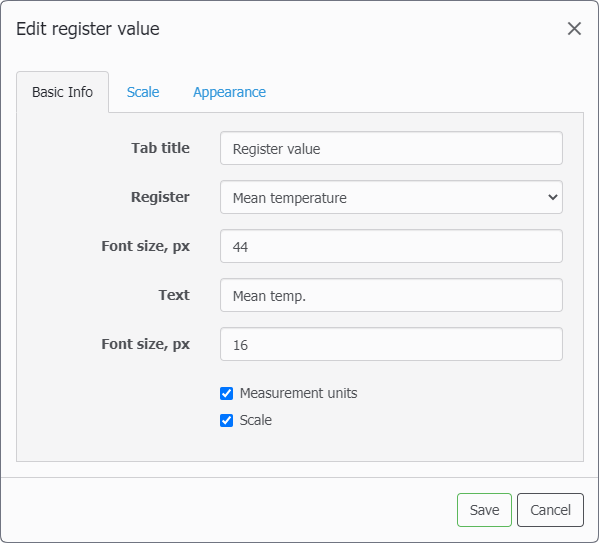
You can add options to add text label, change font size for both value text and text label, display measurement units and scale:
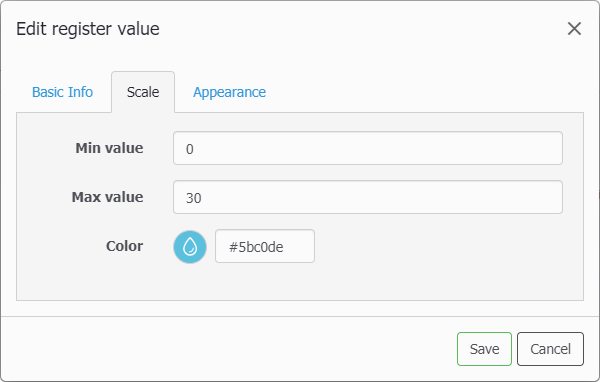
For a scale, you set start, end point and its color:
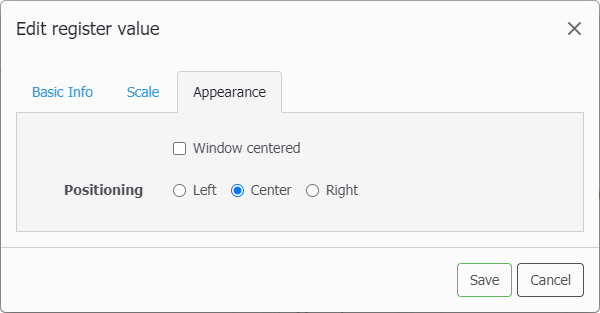
If you want the value be centered with the scale, choose windows centered option in the Appearance tab:
Please note that in the edit mode the value is refered to as “Ey.x”, where E - means event, y - event id, x - action number.
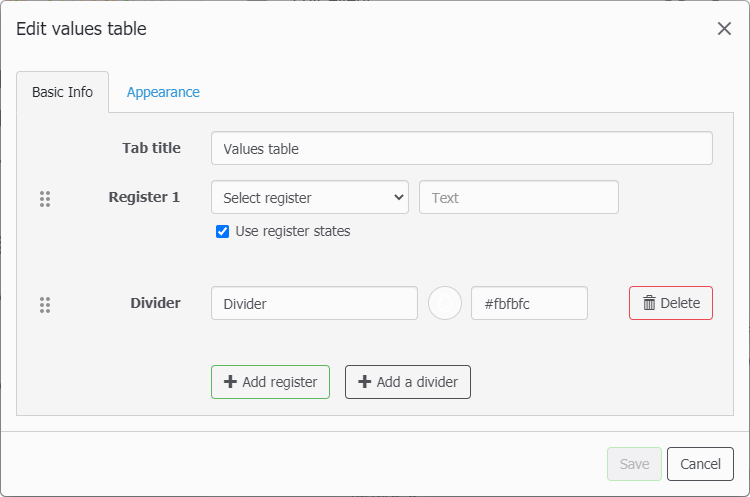
Values table
Values table widget is identical to that one in the screen editor except for register selector (only from event's actions).
Bar char, hystogram, pie chart
These are identical to the screen editor widgets, except for the register selector.
Text widget
It is simple html editor, please refer to the video below. For the actions - you can type action address in the form of Ey.x or use action picker.

Other event usage options
Besides above application, there are extra options for the recorded event data:
Get event data from external applicaion via API
Send event data to Level2
There is a report builder in the Level2 system as well which uses data taken from WebHMI as a source. More on this here.
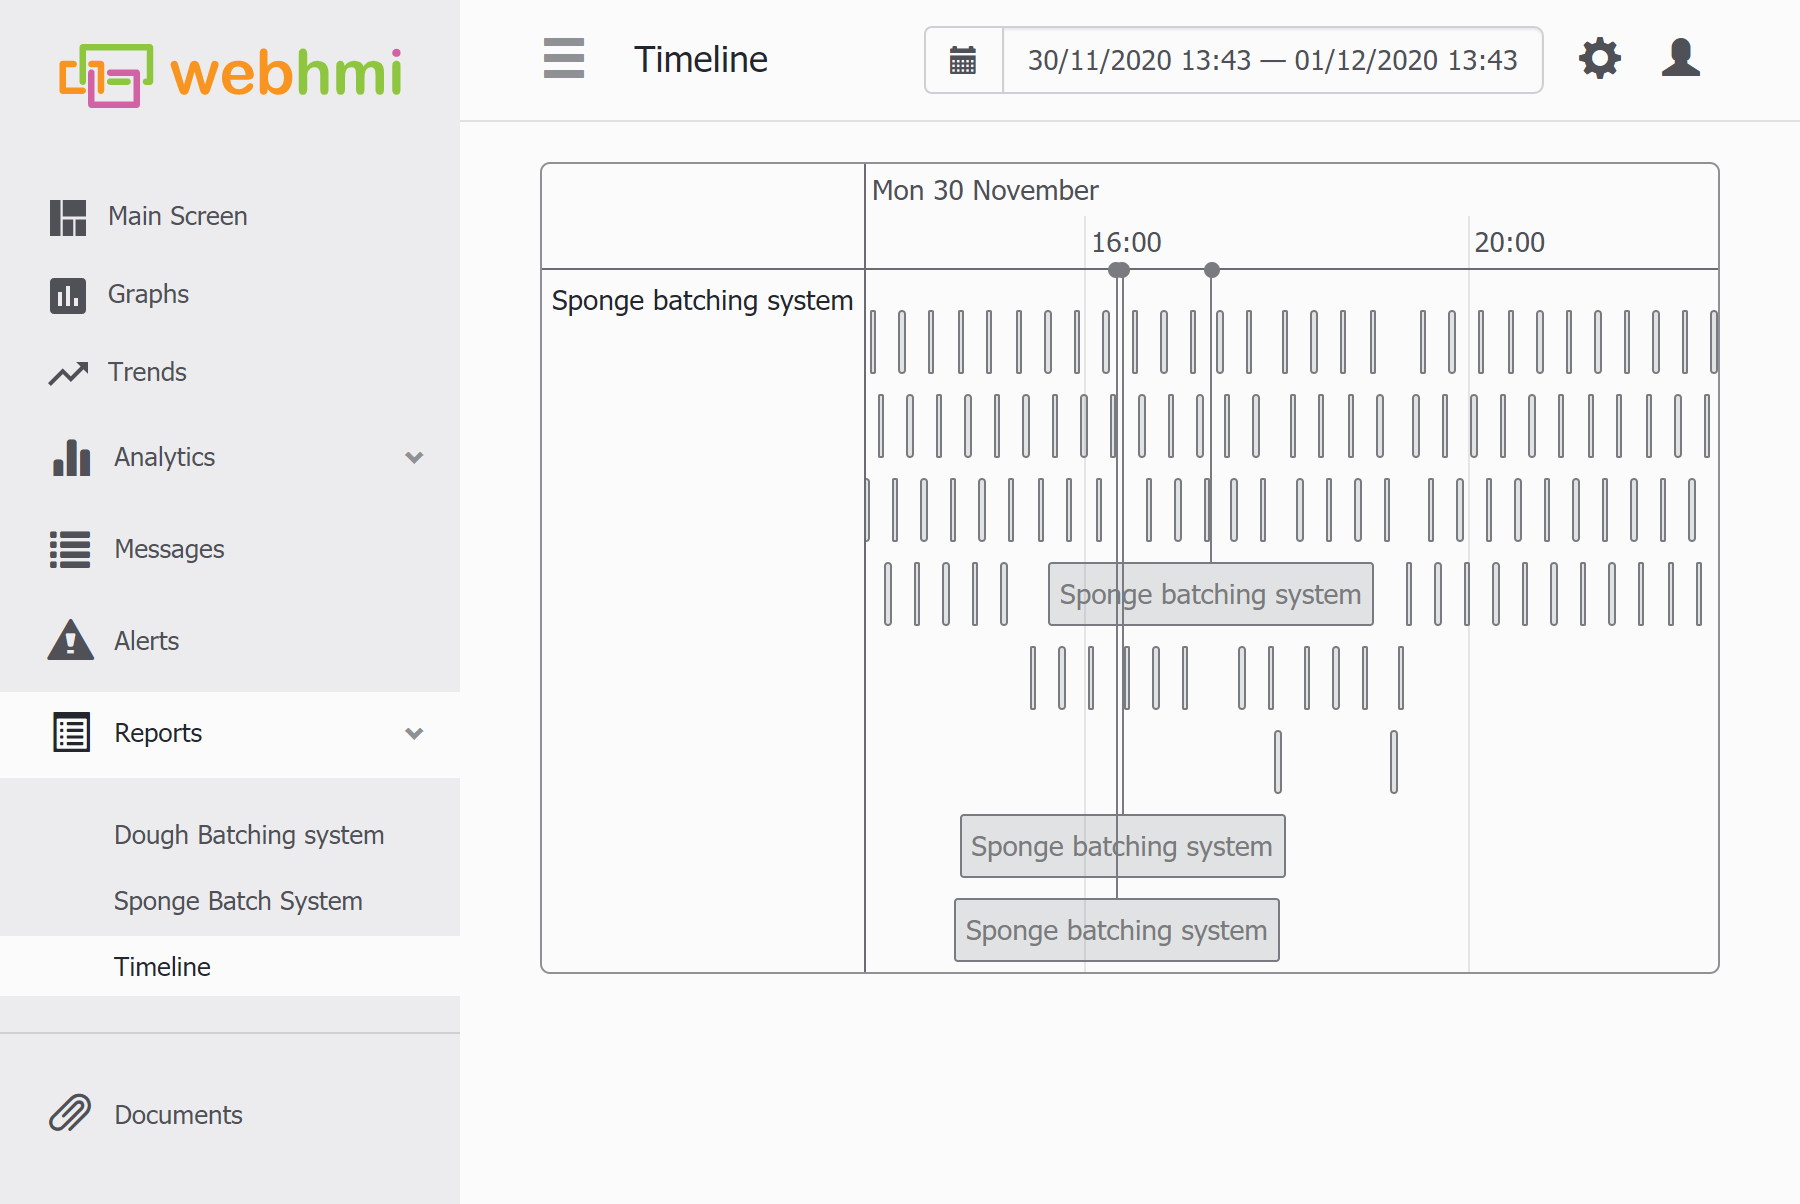
Creating a timeline based on time from the event
When you set Show on timeline checkbox for events, the timeline view become available in the Report sub-menu where you can analize how the events has been logged.
Advanced customized reports based on events, screens, lua and api
The Report constructor for events may not be convinient in some cases:
- the processes last long time (days, weeks, monthes, years etc) and event logging may be interrupted by some maintenacne or other occastions which is not acceptable (this will split the event)
- you need to generate report which unites data from many different events, so you can not use event's report constructor which is bound by one event and its sub-events
- the system consist of many logical units which would require to make a lot of duplicating reports
In this cases, still a desired report can be obtained from particular events, lua, api and screen/dashboard editor. You can use the following approach:
- use screen/dashboard for user report setup (picking dates, machines, shifts etc.)
- use lua script which would make api call to webhmi's event log and fetch neccessary data
- use javascript to change screen widget properites - start / end time for graph, changing parameters etc.
Please refer to the following application note.
Notes on event usage
Editing events in the running project
Due to 'on the fly' method of recordig events, WebHMI project restart will cause an event being recorded to “split”. If you have some important report or critical data in your project and edit or comission the project remotely, apply changes when the event unlikely to happen or won't cause data distortion.
One - time events
With one-time event, i.e. those not having 'event has duration' checkbox set, remember that while the event condition is true WebHMI will generate excess records in the DB on every scan. Use lua script which provides one scan duration of the event enabling condition.
The script which gives a right condtion for an one-shot event (running every hour) could be like this:
function main (userId)
  -- vars
  local prev_cur_hour = R("cur_hour") -- read current stored value
  local cur_hour = os.date("%H", os.time()) -- read RTC
  -- logic
  if (cur_hour ~= prev_cur_hour) then
     W("one_time_event_condition", 1)
     W("cur_hour", cur_hour)
  else
     W("one_time_event_condition", 0) -- prevents further calls
  end
end
Lasting events with different start and end condition
Be carefull with different start and end condition for lasting events. Becuase when they intersect, i.e. end conditino happens while start condition is true, you will get multiple events at once.